Sync Time in Remote Server

On rare occasion, you might experience connectivity issue due to resolving DNS name while connecting to a remote server via RDP.  It turns out it has nothing to do with DNS but to do with TIME.

The time of remote server is out of sync (for some reason it cannot be synced with time server). If it is out by more than about 5 minutes, then the remote server will reject the connection and make the DNS think that the remote server is not available in the network so DNS error appears.

To address time out of sync, the first thinking is to get to the remote server and update the time. However, the challenge is that RDP remote desktop is unreachable… so how to update the time in a remote server?

A tool called PsTools and details is here. It is a tool for infrastructure engineers but also good tool for developers who would like to get the job done and connect to remote server ASAP.

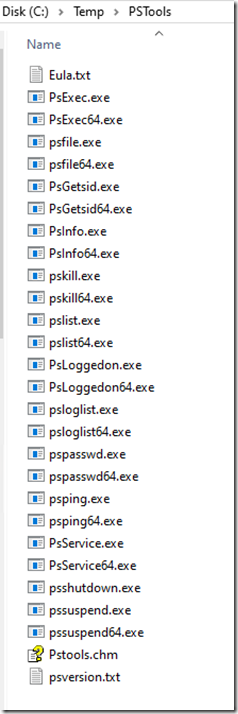
Once download and unzip PsTools, there are a handful list of tools available and the key one is ‘PsExec’ which allows engineer to execute a command in a remote server given permission granted.

image

Check remote server time – ‘net time \\remote-server-name’

C:\Temp\PSTools>net time \\remote-server-name
Current time at \\remote-server-name is 23/11/2020 12:41:56 PM

The command completed successfully.

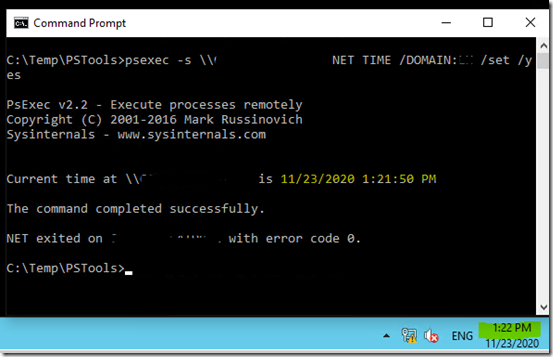
Update remote server time – ‘psexec -s \\remote-server-name NET TIME /DOMAIN:remote-server-domain-name /set /yes’

C:\Temp\PSTools>psexec -s \\remote-server-name NET TIME /DOMAIN:remote-server-domain-name /set /yes

PsExec v2.2 - Execute processes remotely
Copyright (C) 2001-2016 Mark Russinovich
Sysinternals - www.sysinternals.com

Current time at \\remote-server-name is 11/23/2020 12:24:30 PM

The command completed successfully.

NET exited on remote-server-name with error code 0.

image

Match remote server time to your local machine time – ‘net time \\remote-server-name /set’

C:\Temp\PSTools>net time \\remote-server-name /set
Current time at \\remote-server-name is 23/11/2020 12:10:46 PM

The current local clock is 23/11/2020 12:21:52 PM
Do you want to set the local computer's time to match the
time at \\remote-server-name? (Y/N) [Y]: y
The command completed successfully.

Automated Image Download

I always hit a wall if I wanted to download multiple images from the internet. Previously I would download one by one and it was time consuming. The image download can eventually be automated with scripts in PowerShell or other shell scripts.

The following are the steps to get this job automated.

1. Create a text file say imagelinks.txt where contains a list of image Url links and make sure these images are accessible from public.

2. Copy the text file (imagelinks.txt) to the folder where the script will be run.

3.1 PowerShell script:

gc imagelinks.txt | % {iwr $_ -outf $(split-path $_ -leaf)}

3.2 Other shell script:

wget -i imagelinks.txt

Premiere Pro Optimisation

Lots of users have chosen Premiere Pro for an video editing tool.  Some of them may not be aware of that there are a few easy tricks to optiomise Premiere Pro to make it lightning fast (speed times X).

The following are a few configurations to get Premiere Pro optimised and you will enjoy the outcome of these.

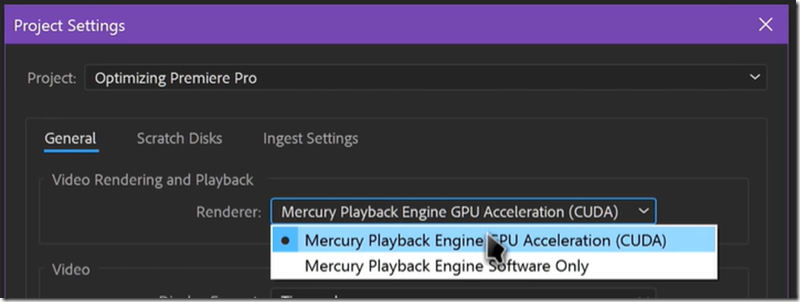
1. GPU acceleration – speed up renders and playback by enabling CUDA of the GPU card in where Nvidia offers CUDA cores but not AMD where offers stream processors).

image[36]image

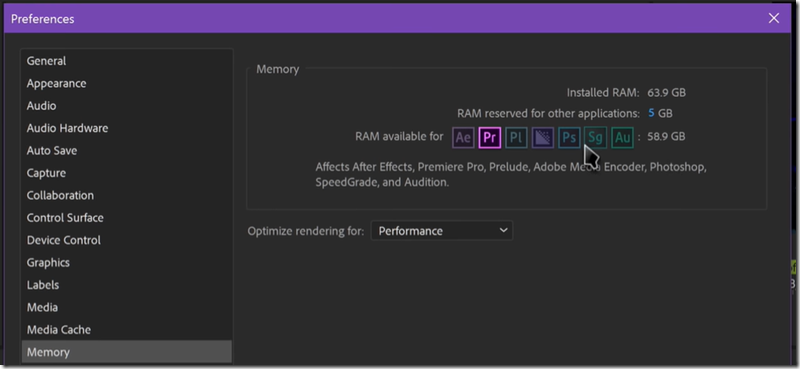
2. RAM – overall optimisation with 64GB. Premiere Pro will default about 70% of total to itself in where helps with encoding and decoding the video.

image

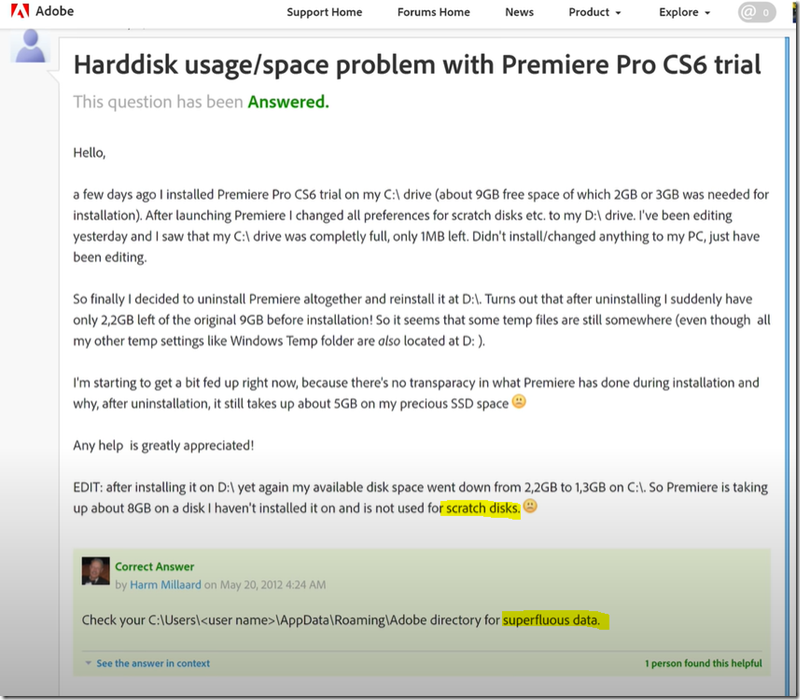
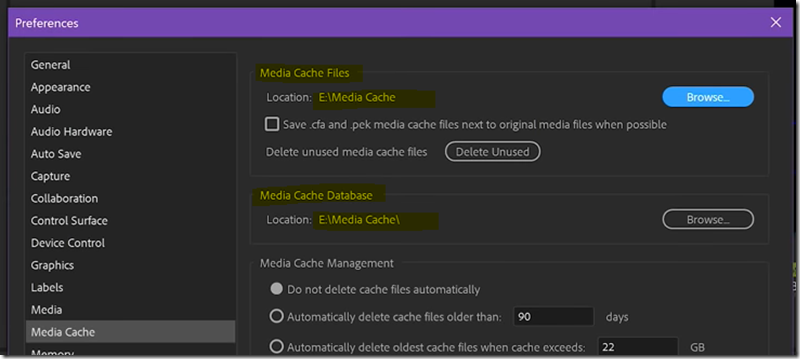
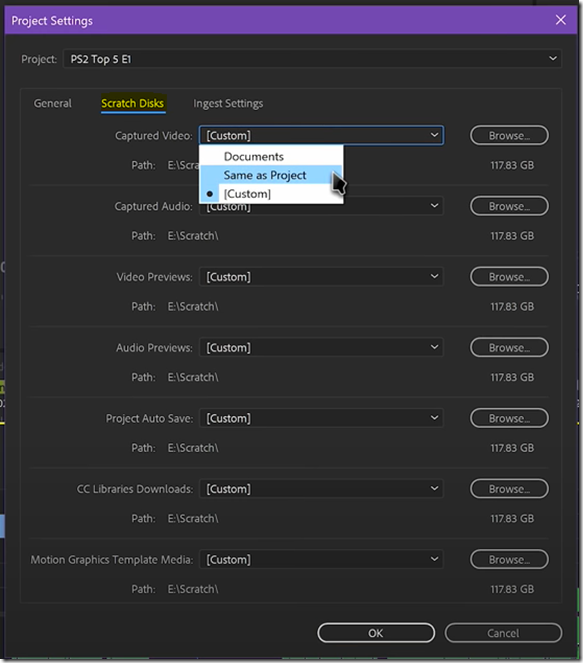
3. Media Cache / Scratch Disks (aka temp files and easy to fill-up storage if use in boot drive which must be avoid) – speed up timeline responsiveness and renders by allocating these temp file in separate (must a) decent PCIe NVMe M.2 SSD.  Scratch Disks stores data for previews.

Ticket from Adobe about hard disk usage here.image

Settings in Premiere Pro in where Media Cache is in app level but Scratch Disks is in project level.imageimage

4. Previews – speed up preview by adjusting playback framerate. image

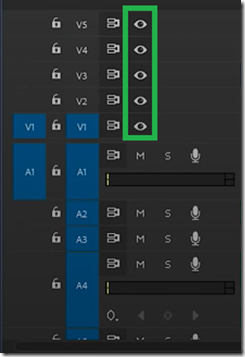
5. Overlay – speed up preview by disabling unnecessary layers.

image

Azure DevOps PowerShell Task

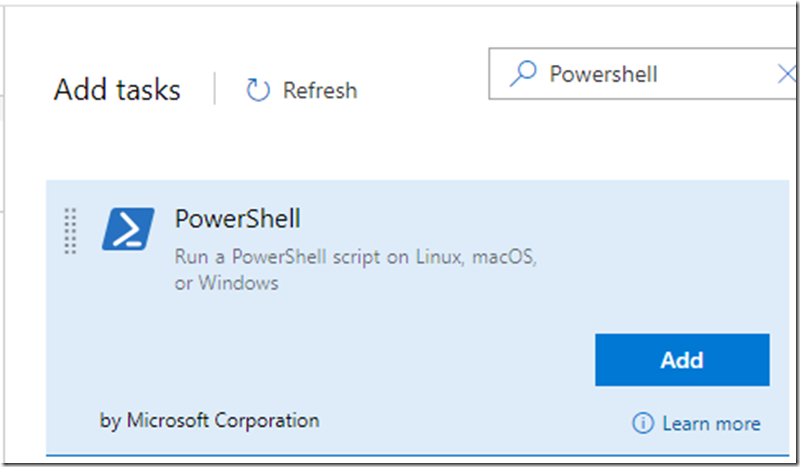
PowerShell task in CD Pipeline is a great add-on task to run Git commands if you would like to clone, add, commit and push. However this is not an easy job to run Git in PowerShell task. There are two additional prerequisites required before Git commands can be run smoothly in PowerShell task which are the permission related (security concern that how you can clone from Git Repos or push to Git Repos if there is no such Git credential provided.image

Prerequisites:

1. Agent Job – tick ‘Allow scripts to access the OAuth token’

Because I created my own Agent in TFS server with OAuth token, I will need to enable any scripts like PowerShell or Bash will have ability to run Git command with OAuth token attached.

OAuth token under my account.image

Enable ‘Allow scripts to access the OAuth token’ for Agent Job.image

Otherwise, error occurs in PowerShell task.

2020-01-17T06:34:58.5521657Z no changes added to commit (use "git add" and/or "git commit -a")
2020-01-17T06:34:59.1917657Z [detached HEAD a712cba] Azure DevOps - Release Pipeline 03
2020-01-17T06:34:59.1917657Z  44 files changed, 90 insertions(+), 90 deletions(-)
2020-01-17T06:34:59.3009657Z fatal: could not read Password for 'https://__xxx__@dev.azure.com': terminal prompts disabled
2020-01-17T06:34:59.4101657Z ##[error]PowerShell exited with code '1'.
2020-01-17T06:34:59.4569657Z ##[section]Finishing: PowerShell Script

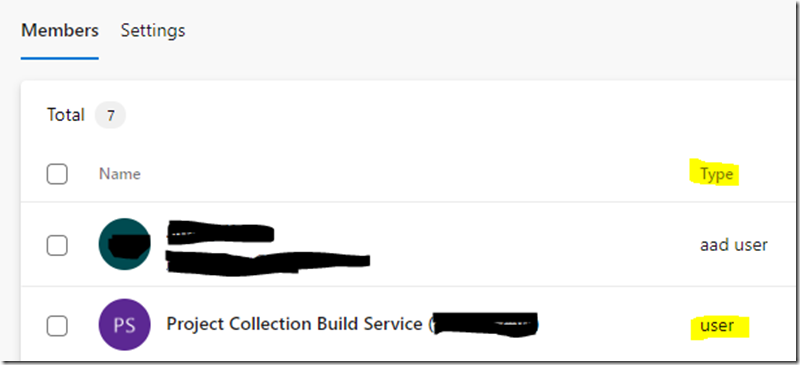
2. ‘Project Collection Build Service (__xx__)’ user – add to my team which offer ‘Contributors’ role which allows to perform ‘git push’ command.

Add ‘Project Collection Build Service (__xx__)’ user to my team.image

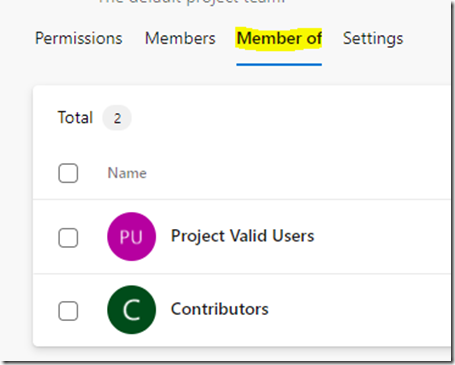
Show my team is member of ‘Contributors’.image

Show ‘Contributors’ with ‘Contribute – Allow’ in Repository level.image

Otherwise, error occurs in PowerShell task.

2020-01-17T09:36:40.6944465Z  44 files changed, 90 insertions(+), 90 deletions(-)
2020-01-17T09:36:40.8192473Z remote: 001f# service=git-receive-pack
2020-01-17T09:36:40.8192473Z remote: 0000000000aaTF401027: You need the Git 'GenericContribute' permission to perform this action. Details: identity 'Build\51c66670-3694-4520-b101-54b40cc49ab0', scope 'repository'.
2020-01-17T09:36:40.8192473Z remote: TF401027: You need the Git 'GenericContribute' permission to perform this action. Details: identity 'Build\51c66670-3694-4520-b101-54b40cc49ab0', scope 'repository'.
2020-01-17T09:36:40.8192473Z fatal: unable to access 'https://__xx__@dev.azure.com/__xx__/__xx__/_git/POC/': The requested URL returned error: 403
2020-01-17T09:36:40.9440481Z ##[error]PowerShell exited with code '1'.
2020-01-17T09:36:40.9752483Z ##[section]Finishing: PowerShell Script

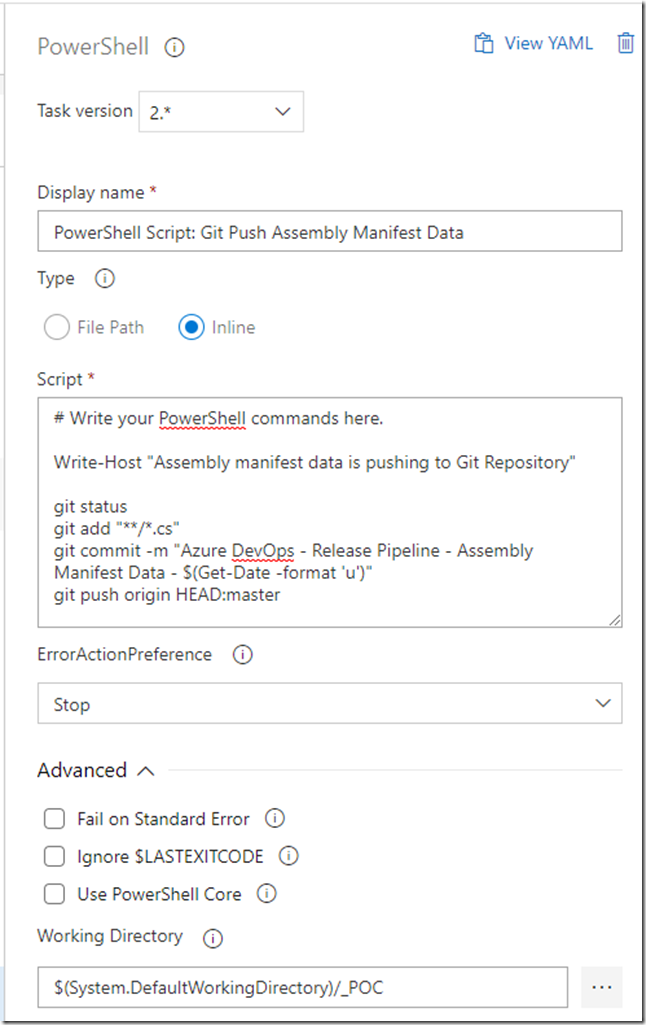
All set and Git commands run successfully in PowerShell task.

# Write your PowerShell commands here.

Write-Host "Assembly manifest data is pushing to Git Repository"

git status
git add "**/*.cs"
git commit -m "Azure DevOps - Release Pipeline - Assembly Manifest Data - $(Get-Date -format 'u')"
git push origin HEAD:master

image

2020-01-17T13:25:40.1803112Z  44 files changed, 90 insertions(+), 90 deletions(-)
2020-01-17T13:25:40.7575075Z To https://dev.azure.com/__xx__/__xx__/_git/POC
2020-01-17T13:25:40.7731074Z    dabefc3..168a7f2  HEAD -> master
2020-01-17T13:25:40.8355070Z ##[section]Finishing: PowerShell Script: Git Push Assembly Manifest Data

Azure DevOps Job Agent

I am building CD for WinForm app… Yes you hear right… It is Winform and I am facing challenge to build MSI package. After Google help, and errors and trials, I realized it is required a custom job agent to build MSI that Azure DevOps does not have task to generate MSI, so it needs to use a special agent to generate MSI in which Azure DevOps offers the facility to setup an agent remotely from your build machine (TFS server or local machine). Azure DevOps will build a tunnel between Azure DevOps and your build machine and then it will use your build machine to process those tasks including MSI generation driven by WiX.  Here are my discovery for sharing.

Background of having on-premises Job Agent: Offer you a full facility and control on your build process, or reuse your existing build process or Azure DevOps does not offer or support the 3rd party you wanted such as MSI or WiX. 

My need: I need to build MSI via WiX so Azure DevOps does not offer this task and I need to reuse my existing build process including WiX script and SQL upgrade script tool.

Required tools: Powershell, local dev machine with VS and VS install project installed.

Azuer DevOps offers a detail instruction to setup on-premises Job Agent but still a good idea to show you how they meant.

1. Click ‘Manage’ to create a new Job Agent in Azure DevOps.image

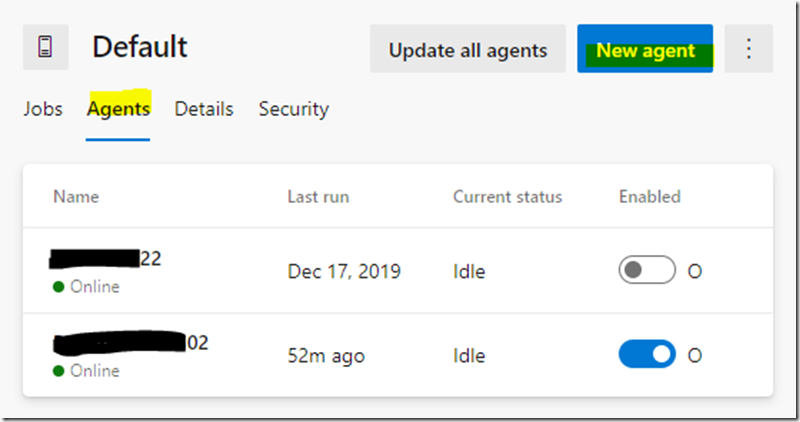
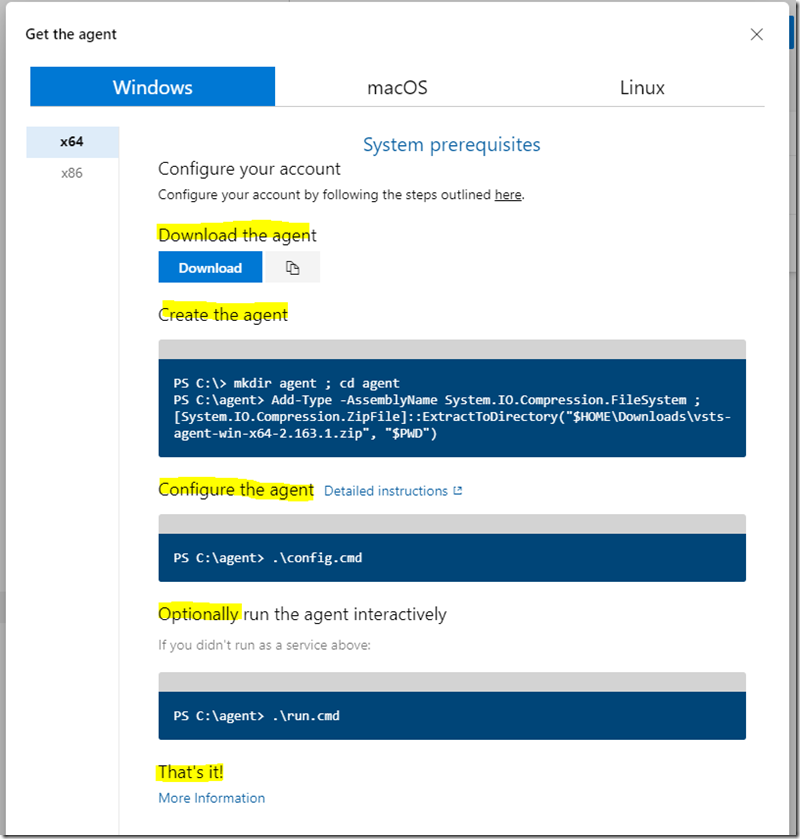
2. In ‘Default’ Agent pool, click ‘New agent’ and you will see a page which shows the summary of on-premises Job Agent. You will get confused at the beginning and I am going to walk you through as the most important info is here.imageimage

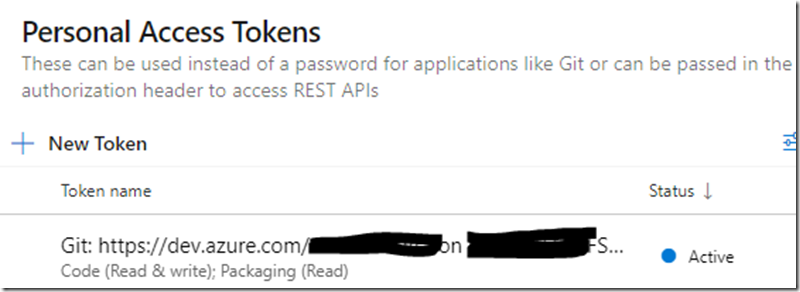
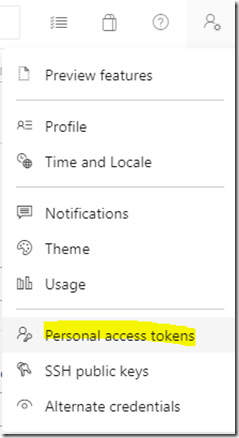
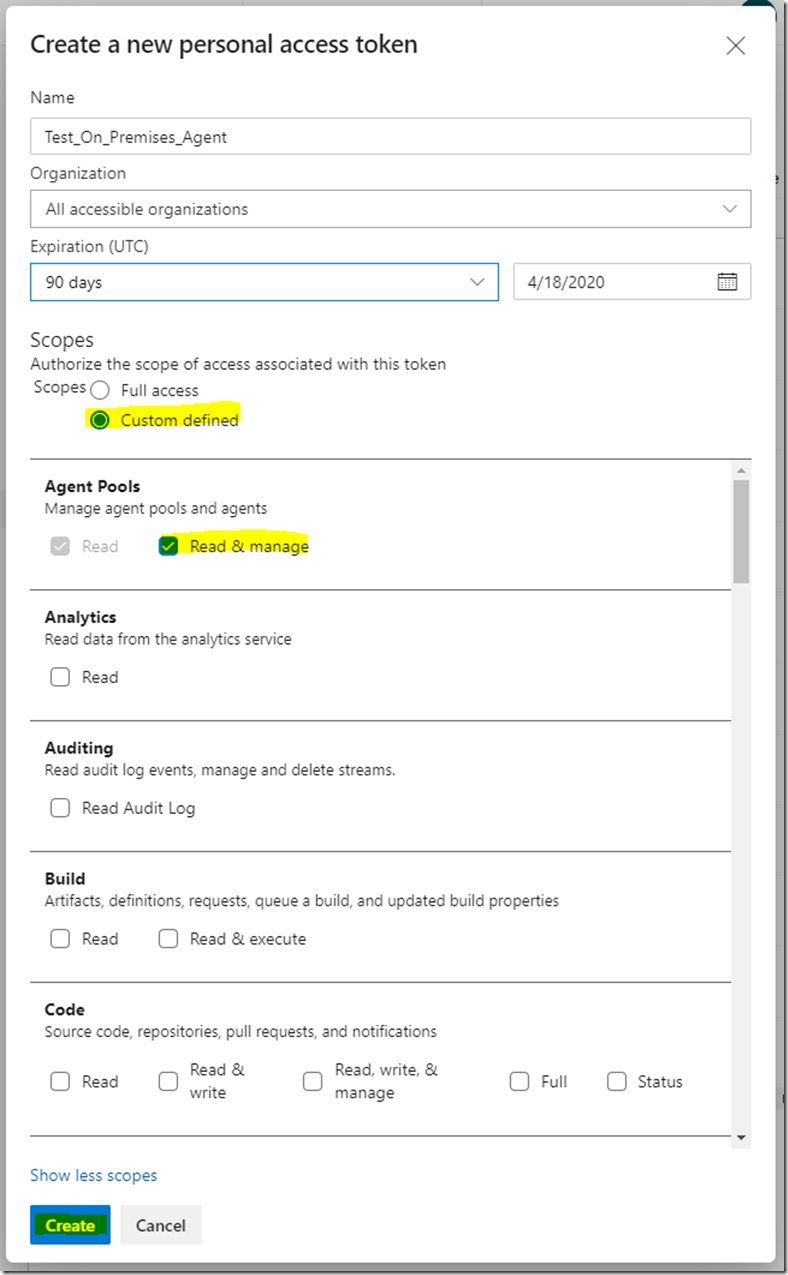
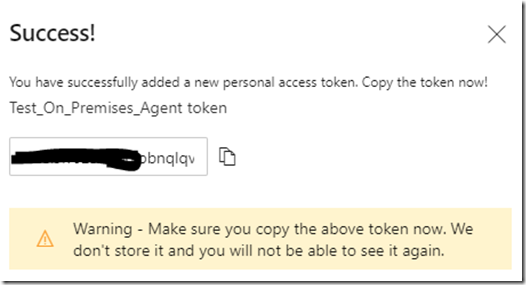
3. Create an access token under you account in where Job Agent will act / proxy like your account especially if you would like to run PowerShell script with Git commands under this account.

imageimage

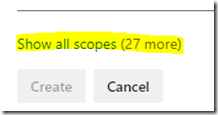
Remember to click ‘Show all scopes’ then you can see ‘Agent Pool’ section.

imageimageimageimage

4. Download the agent zip file.

image

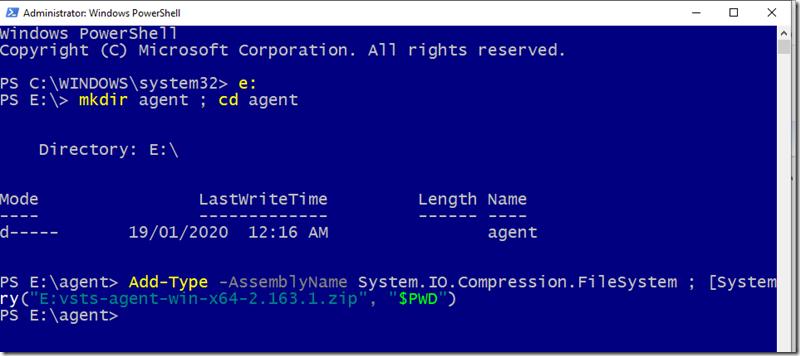
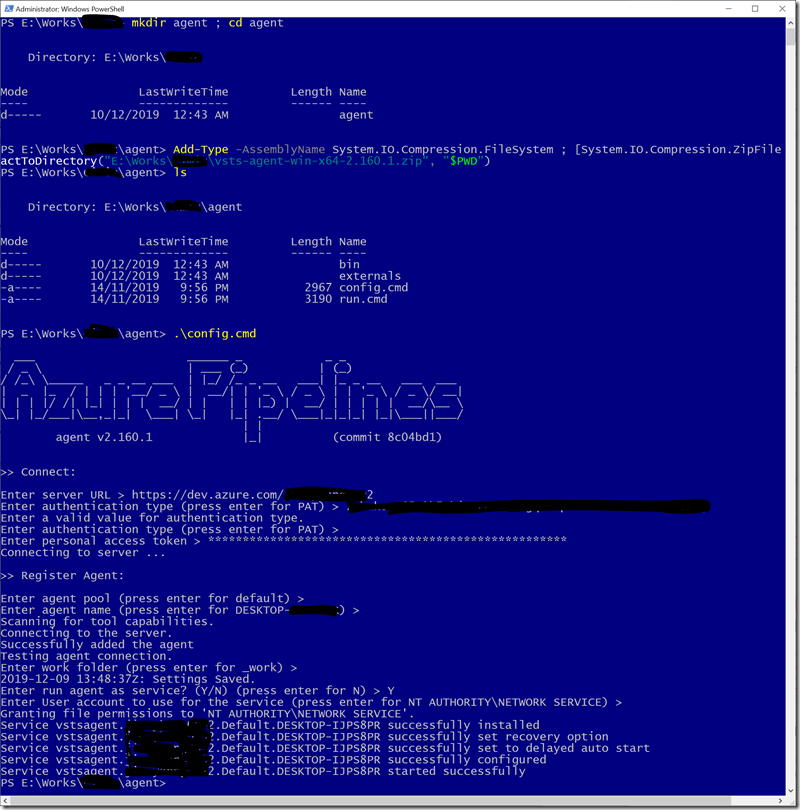
5. Open PowerShell and run this script to create the agent. Please update the file path for downloaded zip.

PS C:\> mkdir agent ; cd agent
PS C:\agent> Add-Type -AssemblyName System.IO.Compression.FileSystem ; [System.IO.Compression.ZipFile]::ExtractToDirectory("$HOME\Downloads\vsts-agent-win-x64-2.163.1.zip", "$PWD")

image

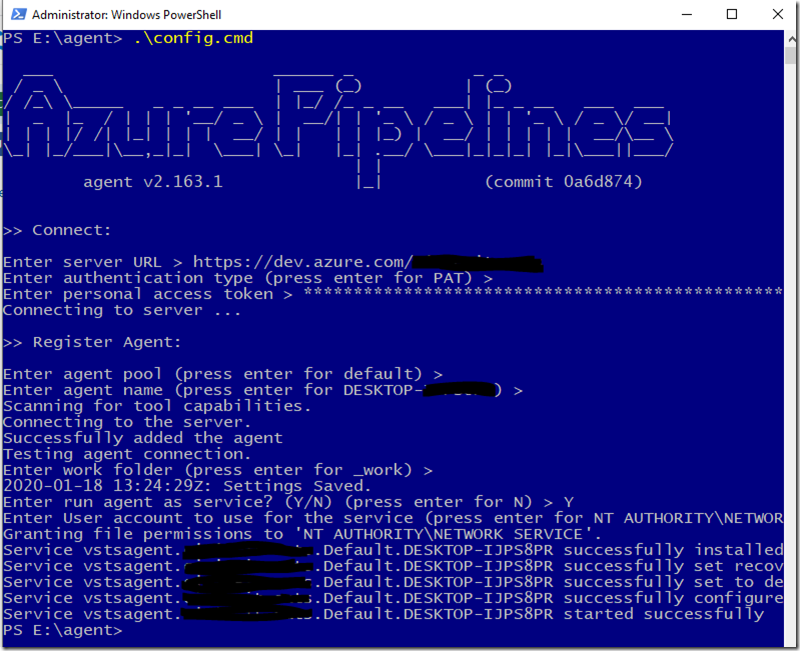
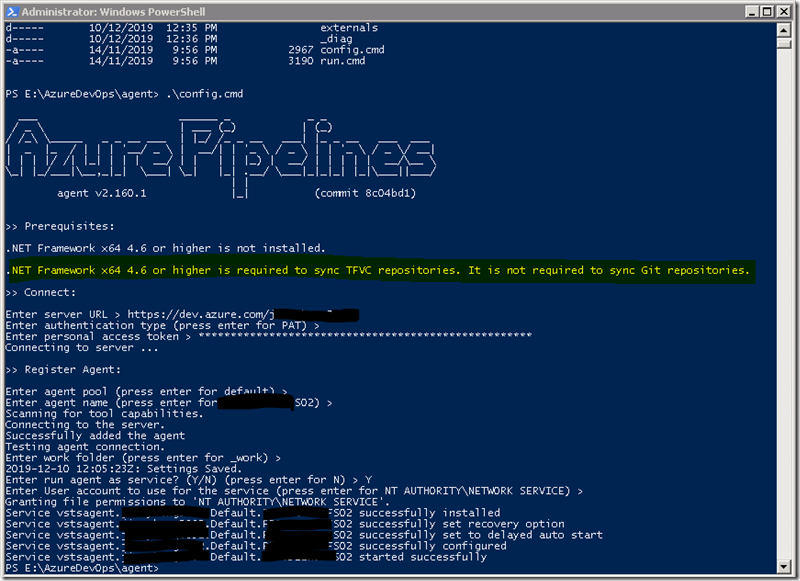
6. Config Job Agent

PS C:\agent> .\config.cmd

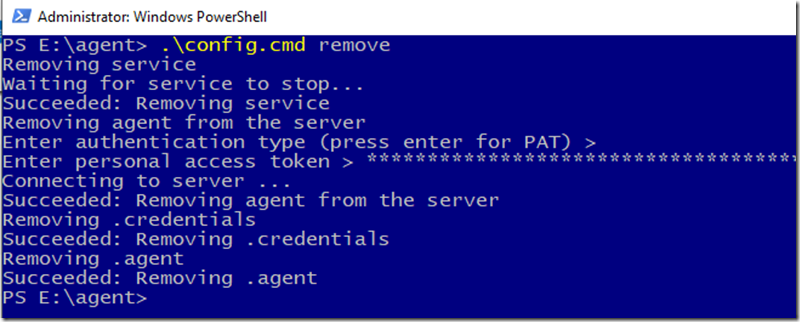
If there is an existing agent, please remove it with ‘config.cmd remove’.image

Job Agent runs as Windows Service using default account ‘NT AUTHORITY\NETWORK SREVICE’ which only has limit privileges. Update this account to the user who can perform more if needed.

 imageimage

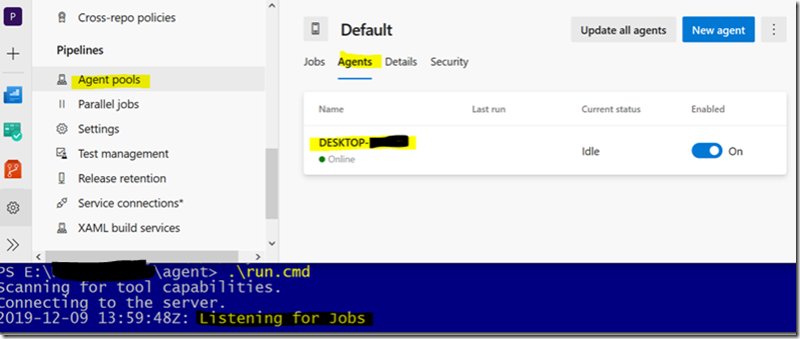
7. Optionally, run Job Agent via PowerShell which is not required as Windows Service takes care of it 24*7.

Summaries: After download the zip, then you must follow the instruction to run the scripts in PS.imageIf everything of configuration worked smoothly, then I can start the job agent in my dev machine (or it is installed as a Windows Service) and start listening the request from Azure DevOps. The job agent in my local dev machine will appear in Azure DevOps Agents list as well. It is quite impressive communication when I understood this concept.

Windows Server 2008R2 worked… amazingimage

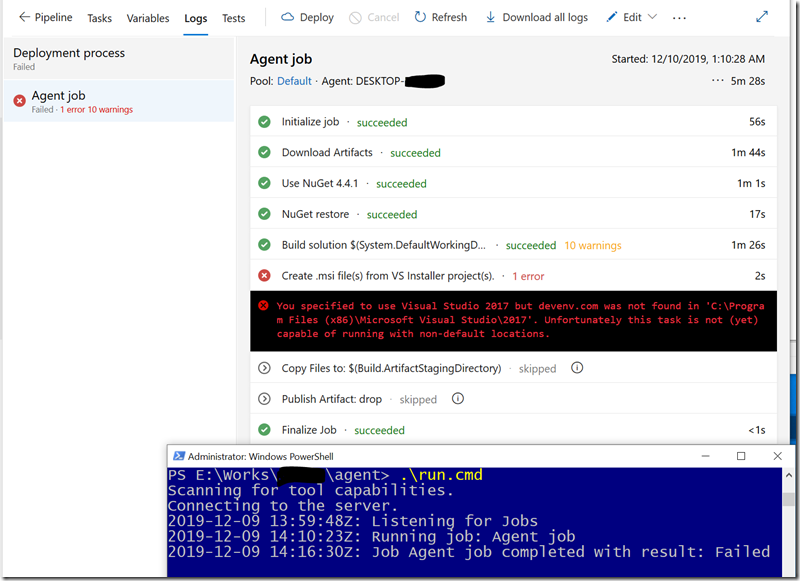
Windows Service – Azure Pipeline AgentimageOr run Azure Pipeline Agent manually in PSimageThen I kicked off the release pipeline for CD and magic thing happened that my local dev machine had started to receive the requests from Azure DevOps to build WinForm app and generate MSI package which requires VS2017 (but I have just got VS2019).imageAfter fixing VS2017. there was another error in building MSI which was ‘ERROR: An error occurred while validating.  HRESULT = ‘8000000A’’.  Run the following command to resolve it.imageimage

C:\Program Files (x86)\Microsoft Visual Studio\2017\Enterprise\Common7\IDE\CommonExtensions\Microsoft\VSI\DisableOutOfProcBuild
DisableOutOfProcBuild.exe

Azure Serverless CI/CD

Since the development of Azure Serverless Full Stack, I was implementing the initial Blazor app driven by microservice API app. In order to handle tons of development which relays on deployment, I have finally implemented CI/CD in Azure where microservice API app and Blazor app will be built and released through CI/CD Azure DevOps pipeline. Now I can enjoy the power of CI/CD and just sit back to focus on development only.

Here are the CI/CD implementation I have self-learnt.

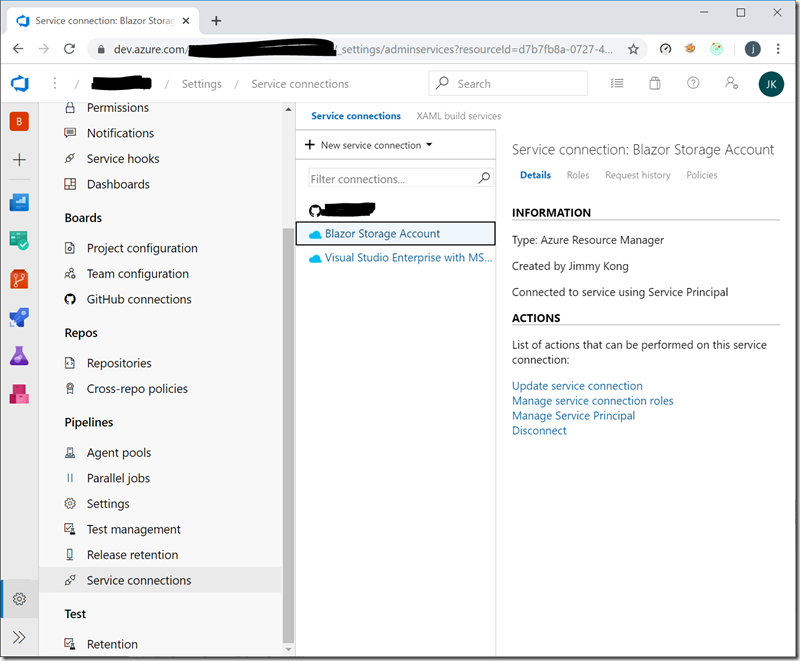
1. Azure service connection will need to be created and established before Azure Pipeline Release. I have multiple Azure service connections to deal with different Azure Group such as backend is a group, and frontend is another group.

image

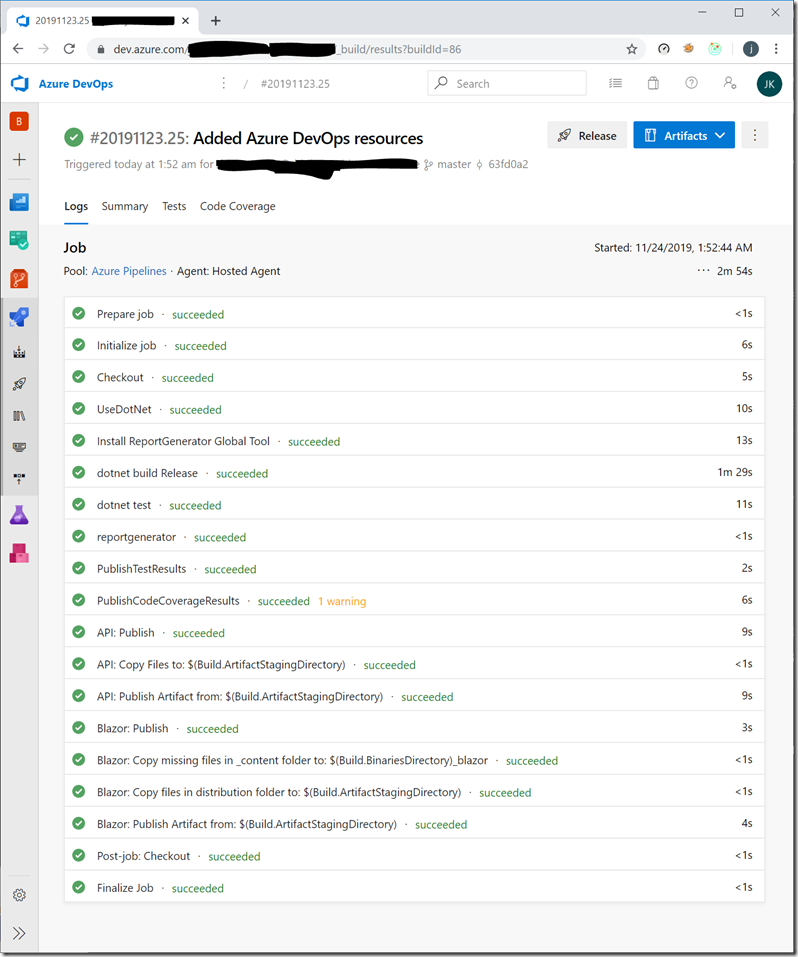
2. With help of visual tool in Azure Pipeline Build, task can be added from a wizard. I have added multiple tasks to handle Build process in which YAML file layouts the workflow of Azure Pipeline Build.

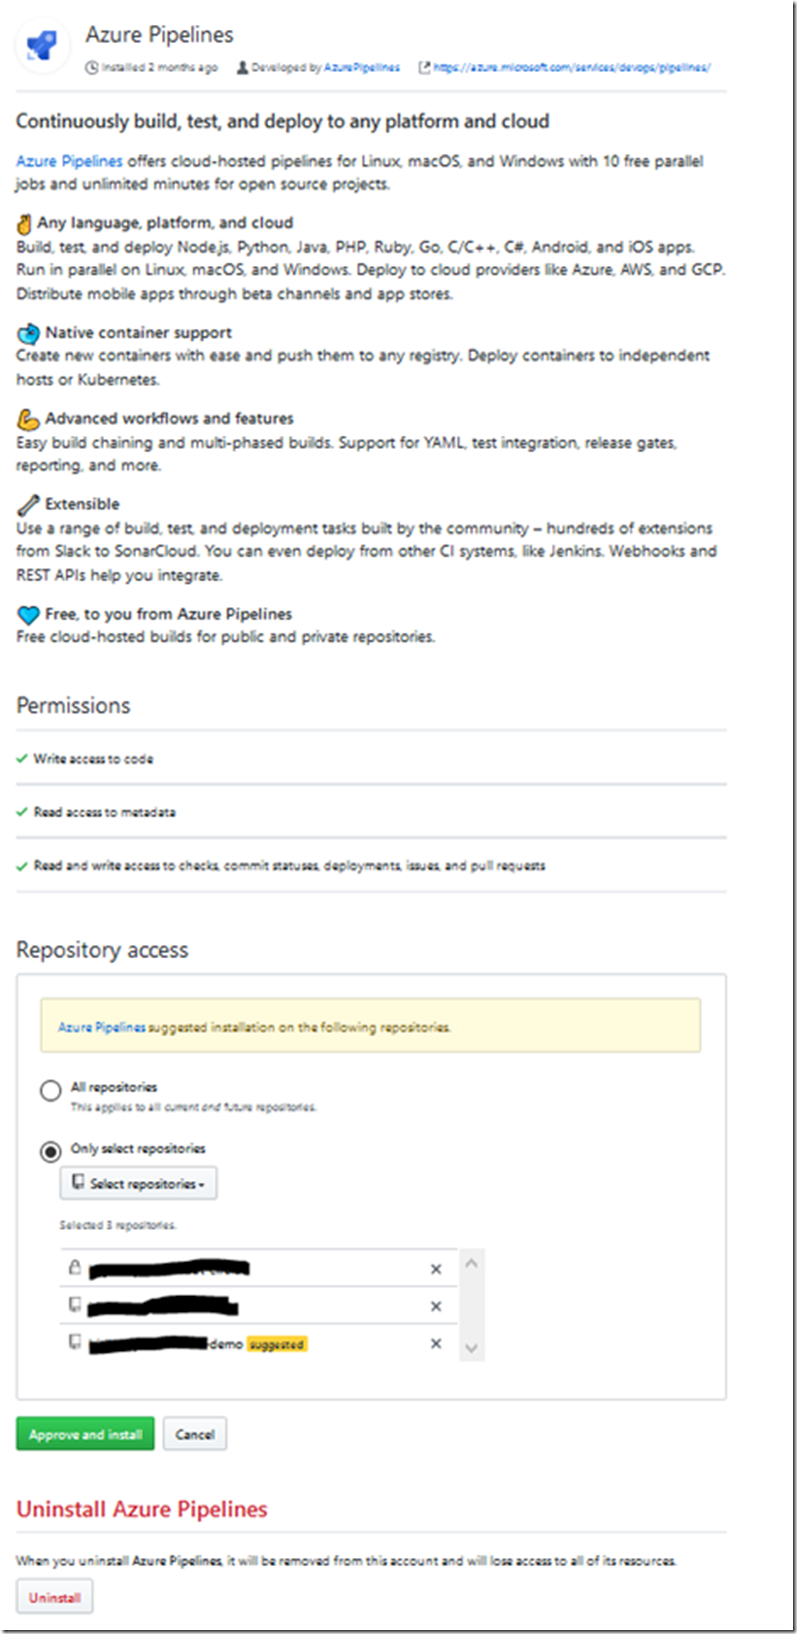
Reference in simple approach:  Building Blazor Apps Using Azure Pipelines

image

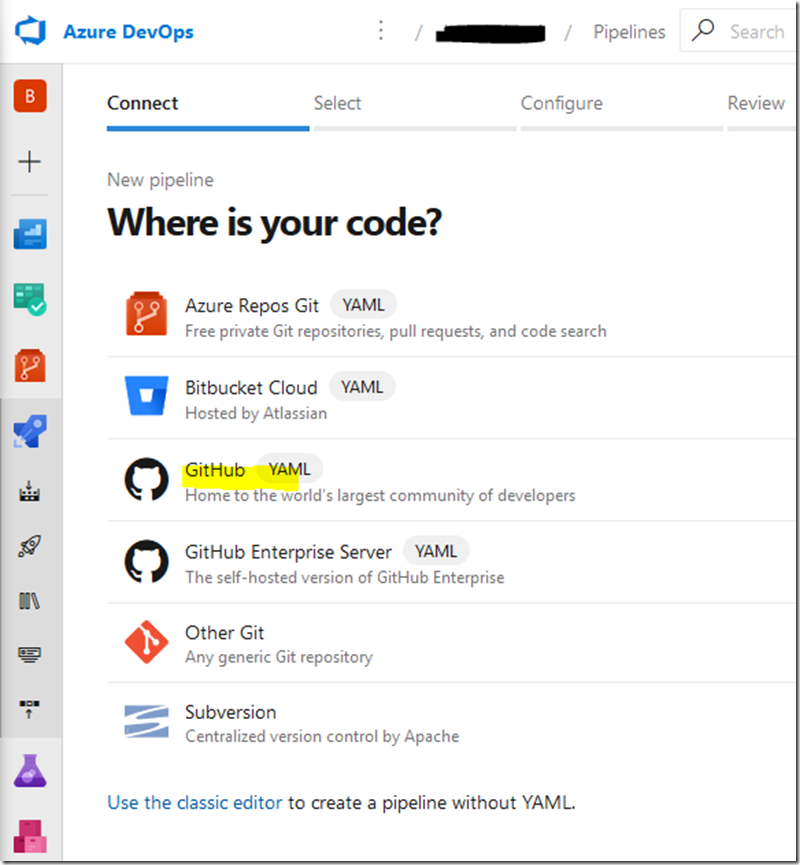
In Action: 2.1 Select the source Git Repositoryimage

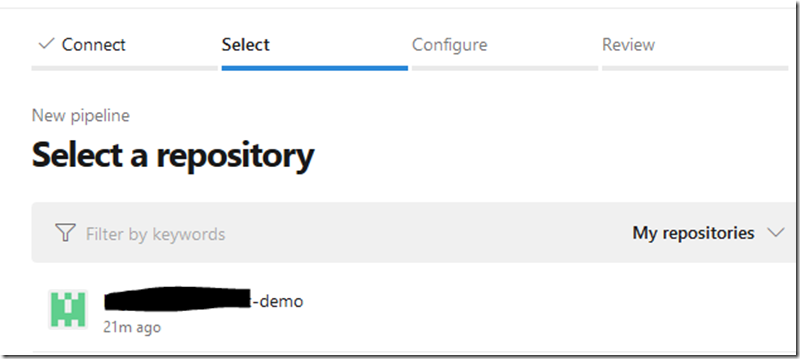
2.2 Select a repository and accept Terms and Conditionsimage

image

image

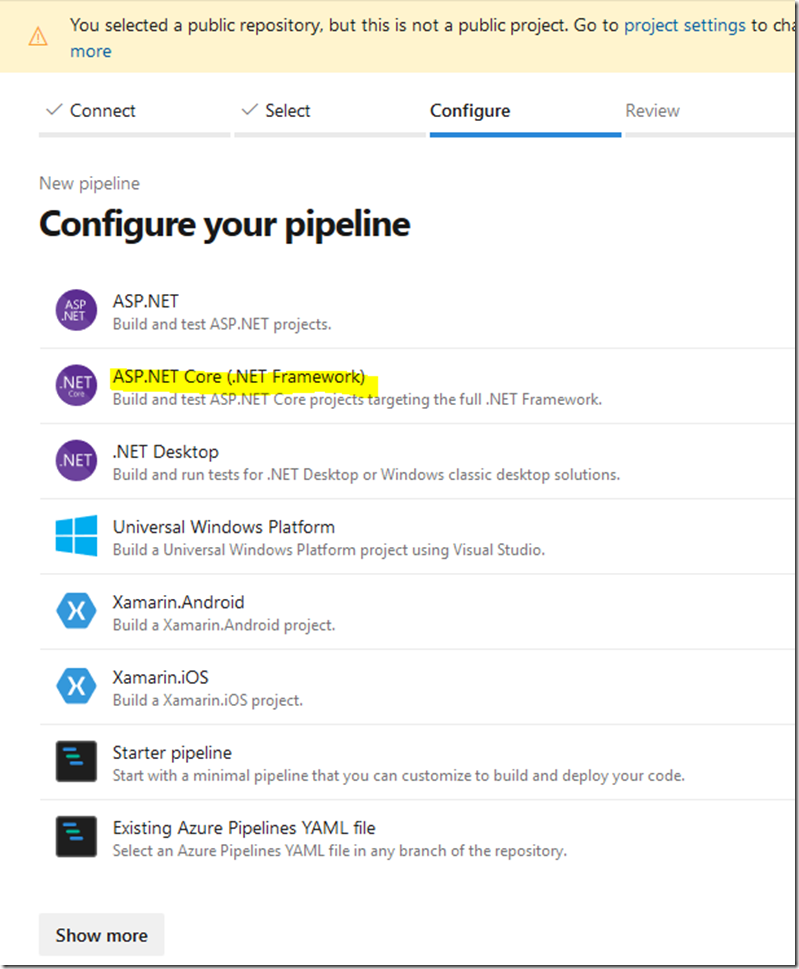
2.3 Configure your pipeline by a template

imageimage

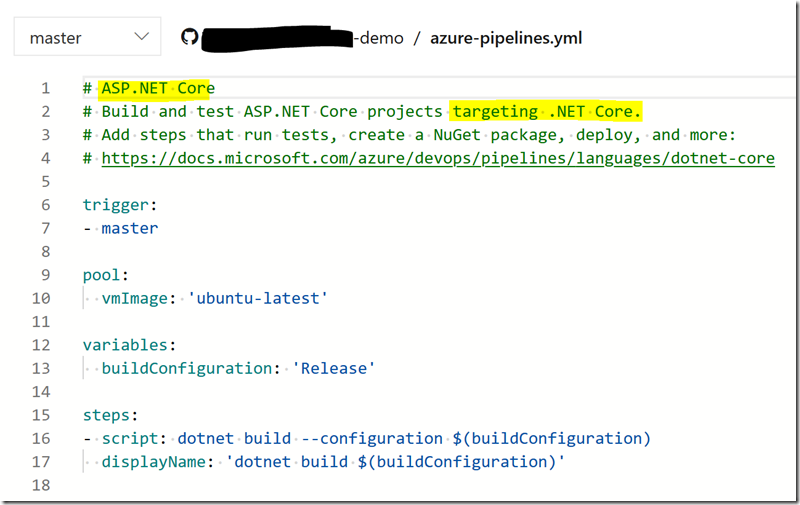
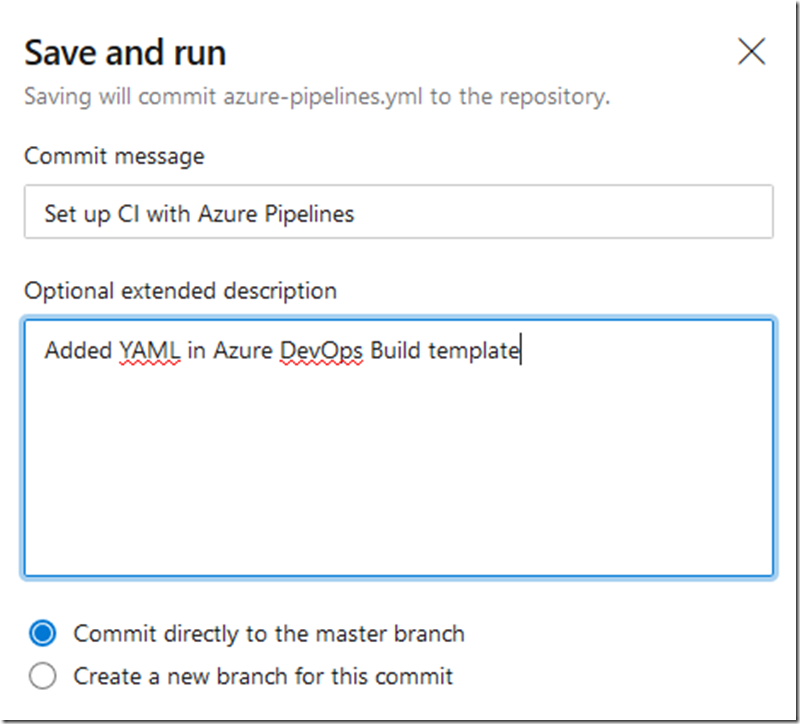
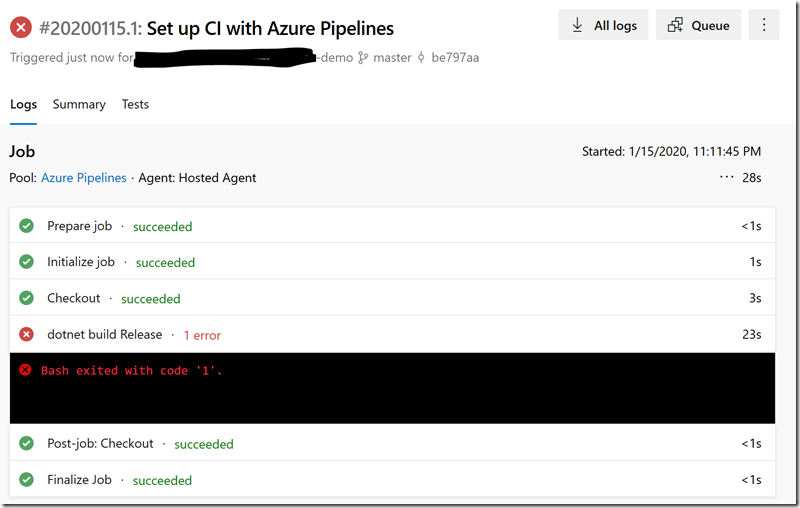
2.4 Review the initial template in YAML which will be altered to your needs. And click ‘Save and run’ to give a try with no harm (the only harm is that the build is failed). the initial YAML will be committed and pushed to your repository in GitHub.

imageimage

And unsurprisingly, the first build using default ASP.NET Core template is failed. Of course, this is not what you need, you need to build API and Blazor apps and then generate the artifacts for Release pipeline to deploy to Azure. Anyway, this is a good start. ‘Hosted Agent’ is an agent in VM in Azure. I have demoed in creating on-premises hosted agent for Windows Desktop Release pipeline.

image

Build failure is due to .Net Core version which is default to 3.0.101imageimage

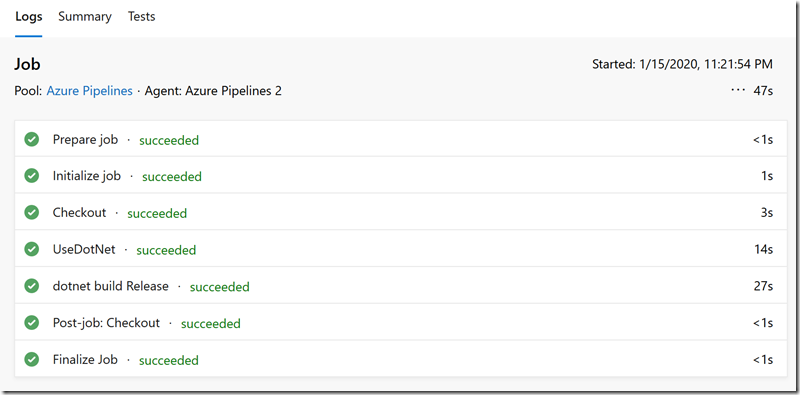
Updated to use .Net Core 3.1.101 and it built…amazingimage

The key factor to run the build with no issue is the version of .Net Core and .Net Standard used in the project which will need to be synced with Build Pipeline.imageimageError if .Net Core or .Net Standard not in synced.image

Full YAML script for my project with API and Blazor apps.

# ASP.NET Core
# Build and test ASP.NET Core projects targeting .NET Core.
# Add steps that run tests, create a NuGet package, deploy, and more:
# https://docs.microsoft.com/azure/devops/pipelines/languages/dotnet-core

trigger:
- master

pool:
  vmImage: 'ubuntu-latest'

variables:
  buildConfiguration: 'Release'

steps:
- task: UseDotNet@2
  inputs:
    version: '3.1.101'

- task: DotNetCoreCLI@2
  displayName: Install ReportGenerator Global Tool
  inputs:
    command: custom
    custom: tool
    arguments: install dotnet-reportgenerator-globaltool -g

- script: dotnet build --configuration $(buildConfiguration)
  displayName: 'dotnet build $(buildConfiguration)'

- script: dotnet test test/__project__.demo.test/__project__.demo.test.csproj --logger "trx;LogFileName=testresults.trx" /p:CollectCoverage=true /p:CoverletOutputFormat=cobertura /p:CoverletOutput=TestResults/Coverage/
  displayName: 'dotnet test'

- script: reportgenerator "-reports:$(Build.SourcesDirectory)/test/__project__.demo.test/TestResults/Coverage/coverage.cobertura.xml" "-targetDir:$(Build.SourcesDirectory)/test/__project__.demo.test/TestResults/Coverage/Reports" -tag:$(Build.BuildNumber) -reportTypes:htmlInline
  workingDirectory: $(Build.SourcesDirectory)/test/__project__.demo.test
  displayName: 'reportgenerator'

- task: PublishTestResults@2
  inputs:
    testRunner: VSTest
    testResultsFiles: '**/*.trx'
    failTaskOnFailedTests: true

- task: PublishCodeCoverageResults@1
  inputs:
    codeCoverageTool: 'cobertura'
    summaryFileLocation: $(Build.SourcesDirectory)/test/__project__.demo.test/TestResults/Coverage/**/coverage.cobertura.xml
    reportDirectory: $(Build.SourcesDirectory)/test/__project__.demo.test/TestResults/Coverage/Reports
    failIfCoverageEmpty: false 

# https://docs.microsoft.com/en-us/azure/devops/pipelines/build/variables?view=azure-devops&tabs=yaml
# https://docs.microsoft.com/en-us/dotnet/core/tools/dotnet-publish?tabs=netcore21
# https://docs.microsoft.com/en-us/dotnet/standard/frameworks
# publish release files to $(Build.BinariesDirectory) without zip to avoid double zip
- task: DotNetCoreCLI@2
  displayName: 'API: Publish .Net Core 3.1'
  inputs:
    command: 'publish'
    arguments: $(Build.SourcesDirectory)/src/__project__.demo.api/__project__.demo.api.csproj -f netcoreapp3.1 -r win-x86 --self-contained false -c $(buildConfiguration) -o $(Build.BinariesDirectory)
    publishWebProjects: false
    zipAfterPublish: false
    workingDirectory: '$(Build.SourcesDirectory)/src/__project__.demo.api'

# https://docs.microsoft.com/en-us/azure/devops/pipelines/tasks/utility/copy-files?view=azure-devops&tabs=yaml
# http://man7.org/linux/man-pages/man3/fnmatch.3.html
# copy from output files (release) to staging directory where files will be placed into Azure pipeline for next step (RELEASE)
- task: CopyFiles@2
  displayName: 'API: Copy Files to: $(Build.ArtifactStagingDirectory)'
  inputs:
    SourceFolder: '$(Build.BinariesDirectory)'
    contents: '**'
    targetFolder: $(Build.ArtifactStagingDirectory)
    cleanTargetFolder: true
    
# drop artifact to Azure pipeline for next step (RELEASE)
- task: PublishBuildArtifacts@1
  displayName: 'API: Publish Artifact from: $(Build.ArtifactStagingDirectory)'
  inputs:
    PathtoPublish: '$(Build.ArtifactStagingDirectory)'
    ArtifactName: '$(Build.BuildNumber)$(Build.BuildId)'
    publishLocation: 'Container'

- task: DotNetCoreCLI@2
  displayName: 'Blazor: Publish .Net Core 3.1 with .Net Standard 2.1'
  inputs:
    command: 'publish'
    arguments: $(Build.SourcesDirectory)/src/__project__.demo.blazor/__project__.demo.blazor.csproj -f netstandard2.1 -c $(buildConfiguration) -o $(Build.BinariesDirectory)_blazor
    publishWebProjects: false
    zipAfterPublish: false
    workingDirectory: '$(Build.SourcesDirectory)/src/__project__.demo.blazor'

# To be included when using 3rd or custom Razor components 
#- task: CopyFiles@2
#  displayName: 'Blazor: Copy missing files in _content folder to: $(Build.BinariesDirectory)_blazor'
#  inputs:
#    SourceFolder: '$(Build.BinariesDirectory)_blazor/wwwroot/_content'
#    contents: '**'
#    targetFolder: '$(Build.BinariesDirectory)_blazor/__project__.demo.blazor/dist/_content'
#    cleanTargetFolder: false

- task: CopyFiles@2
  displayName: 'Blazor: Copy files in distribution folder to: $(Build.ArtifactStagingDirectory)'
  inputs:
    SourceFolder: '$(Build.BinariesDirectory)_blazor/__project__.demo.blazor/dist'
    contents: '**'
    targetFolder: $(Build.ArtifactStagingDirectory)
    cleanTargetFolder: true

- task: PublishBuildArtifacts@1
  displayName: 'Blazor: Publish Artifact from: $(Build.ArtifactStagingDirectory)'
  inputs:
    PathtoPublish: '$(Build.ArtifactStagingDirectory)'
    ArtifactName: '$(Build.BuildNumber)$(Build.BuildId)_blazor'
    publishLocation: 'Container'

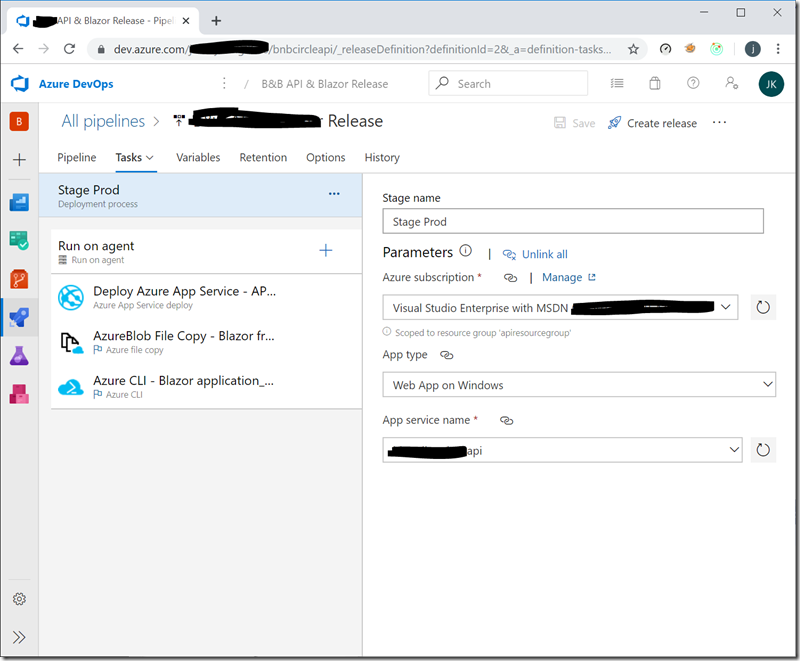
3. In Azure Pipeline Release, I have defined 3 tasks for API and Blazor apps. 1st one is to deploy API app. 2nd one is to deploy Blazor app. The last one is to update wsam content type via Azure CLI.

Reference in simple approach: Deploying Blazor Apps Using Azure Pipelines

imageimageimage

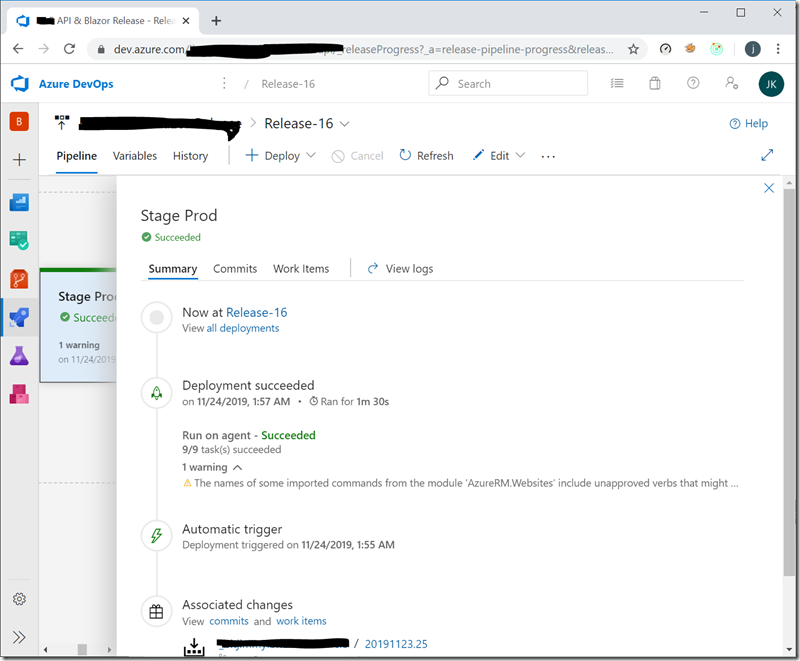
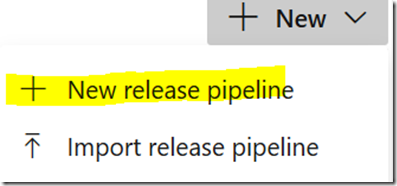
In Action: 3.1 Add a new release pipeline

image

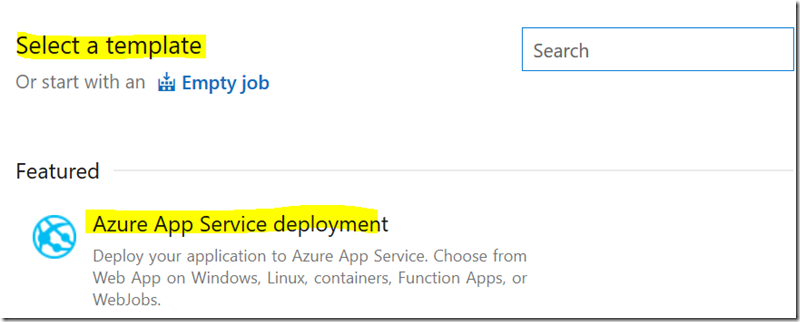
3.2 Select a template and ‘Azure App Service deployment’ is a good start.

image

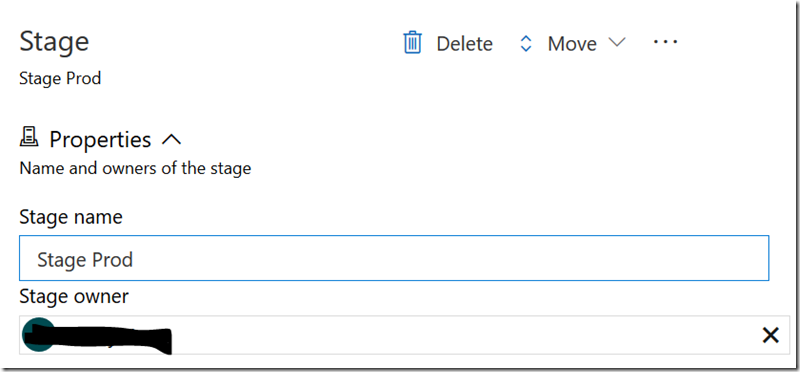
3.3 Name the Stage

image

3.4 Name the new release pipeline

image

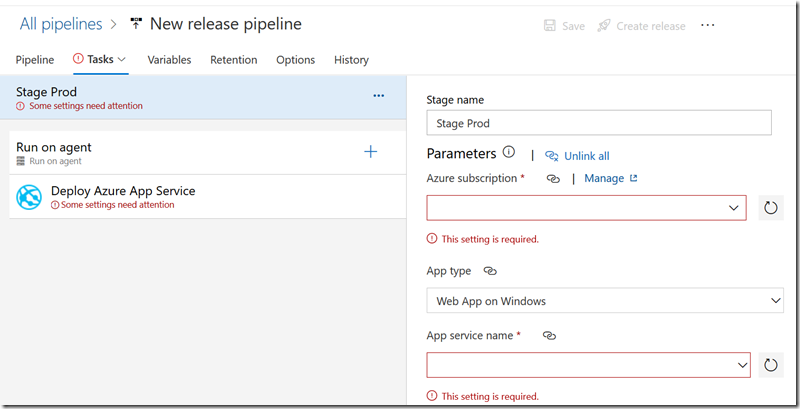
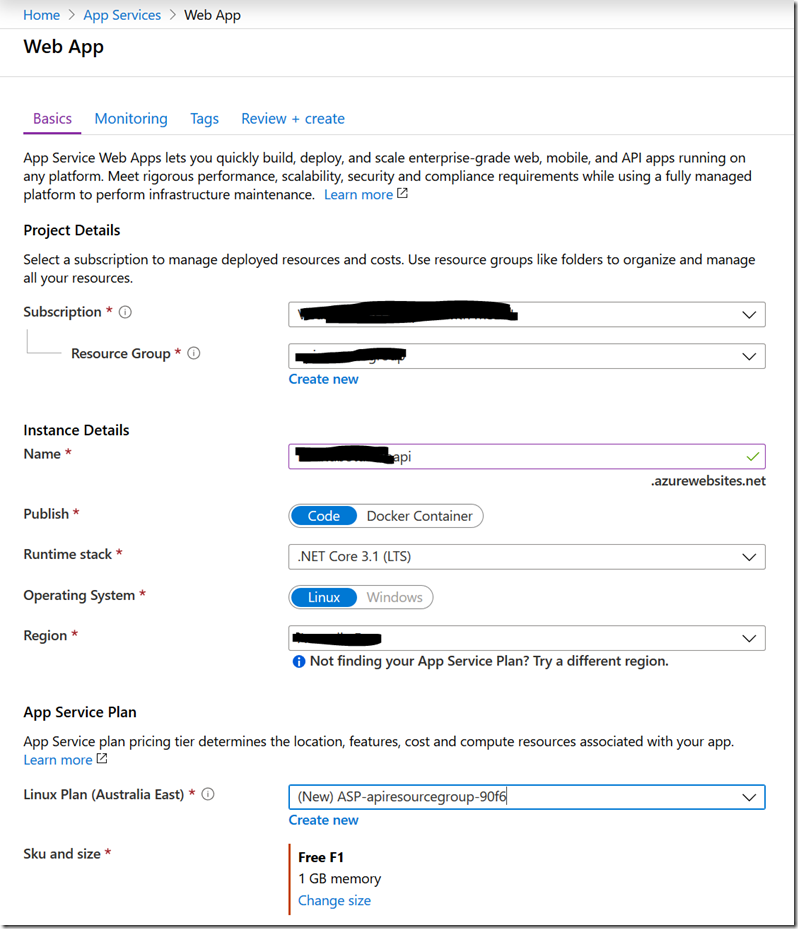
(Not working as App Services in Windows OS is not available) 3.5 Configure ‘Deploy Azure App Service’ and I will need to setup App Service in Azure before this task can pick up my services.

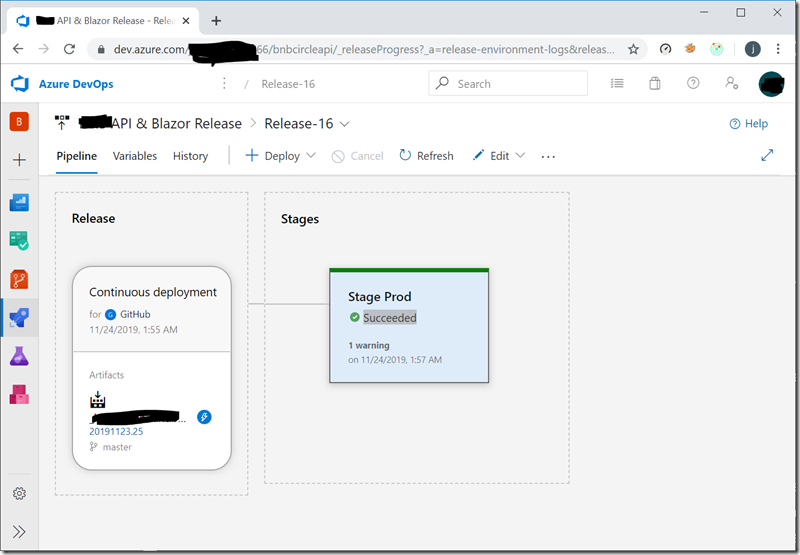
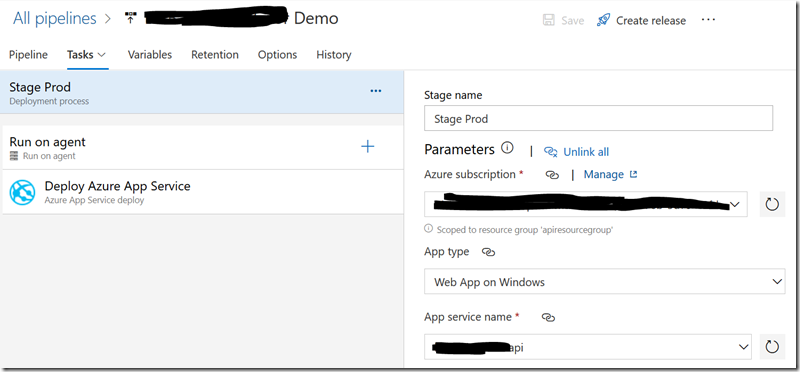
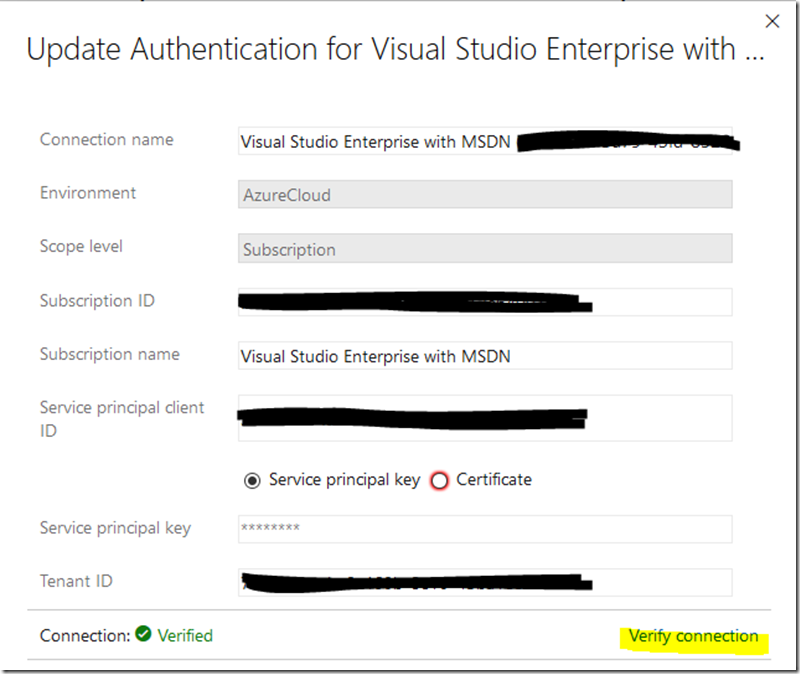
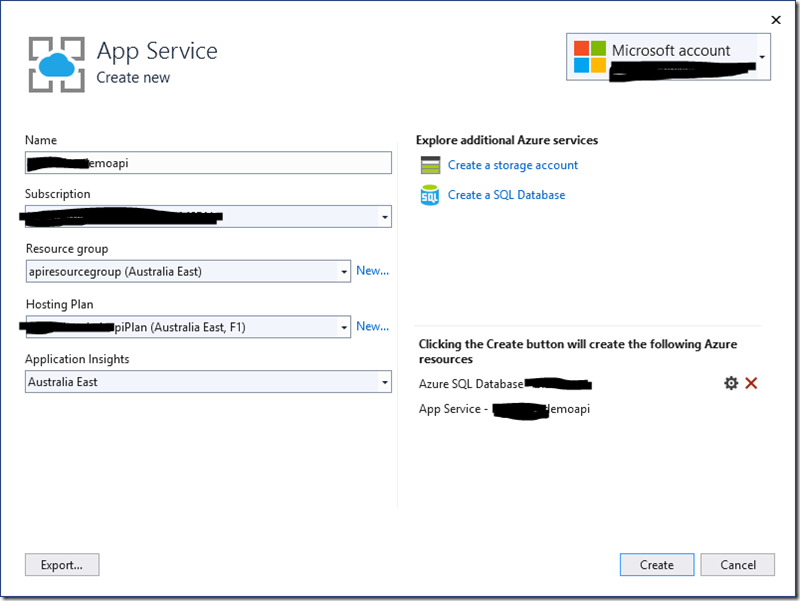
imageimage3.5 Create a new App Services via Visual Studio 2019 in where Publish option offers a wizard to create a new App Services in Windows OS platform seamlessly with no issue. This gives me hassle free to setup ‘Deploy Azure App Service’ in CD.imageIn some scenario, I have been asked to ‘Authorize’ again in ‘Deploy Azure App Service’ task in CD so I can attach the newly created ‘App service name’ in Azure. If so, I go ‘Project Settings > Service connections’ and then edit Azure account with ‘Verify connection’. When connection is ‘Verified’, ‘Deploy Azure App Service’ task in CD is restored.imageTested release pipeline and it worked like a charm.imageI am  more interested in how ‘MSDEPLOY’ command being constructed to build and deploy .Net Core API project from artifact to App Services.

2020-02-01T14:35:26.7587302Z [command]"C:\Program Files\IIS\Microsoft Web Deploy V3\msdeploy.exe" -verb:sync -source:IisApp='d:\a\r1\a\_xxxx__._xxxx__-demo\20200201.1111' -dest:iisApp='_xxxx__demoapi',ComputerName='https://_xxxx__demoapi.scm.azurewebsites.net:443/msdeploy.axd?site=_xxxx__demoapi',UserName='$_xxxx__demoapi',Password='***',AuthType='Basic' -enableRule:AppOffline -retryAttempts:6 -retryInterval:10000 -userAgent:VSTS_f402cf2d-7cd4-41bf-b27e-95aaa50cf151_Release__56_56_1

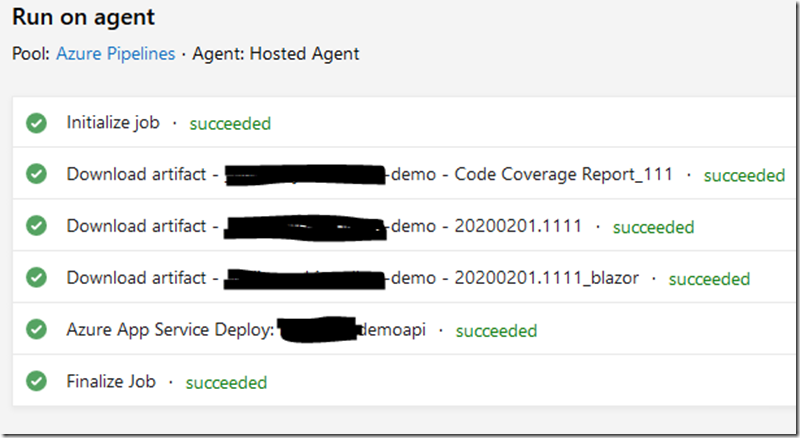
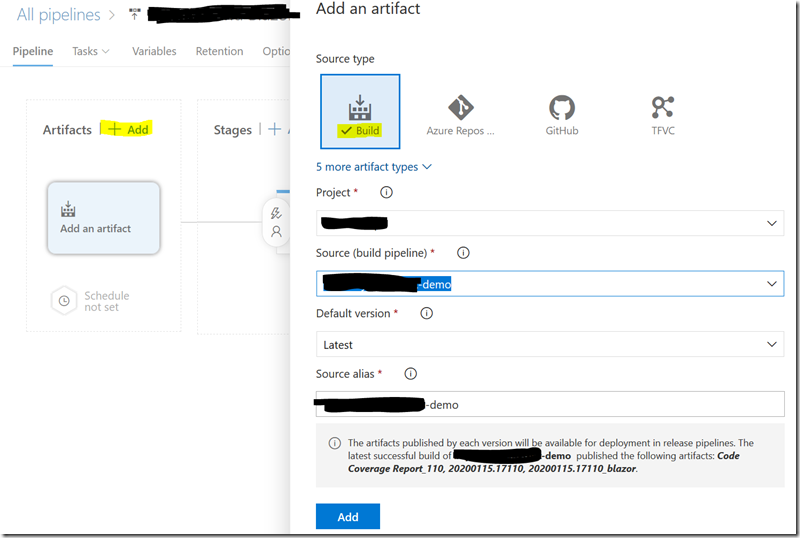
3.6 Add Artifacts / Source to Release Pipeline, so tasks can be executed based on Artifacts / Sources in where I have 3 Artifacts (one for API, another one for Blazor, last one is ignored which is for unit test report)

image

Azure Serverless Full Stack

MUST READ blog – to save you lots of troubleshooting time: Serverless is a new way to host your applications in cloud infrastructure which gives DevOps teams hassle free for server maintenance.  Serverless offers auto scaling on demand which gives applications to handle high demand if needed.  It is charged on demand usage which gives cost effective to organisation in where they don’t need to pay 24*7 and 365 days hosting cost. One thing needs to be considered if you go for serverless infrastructure is about the level of portable like docker image.  Serverless is highly couple to cloud service provider in where you will not able to transfer your applications from one cloud service provider to another easily. Use case like having a serverless Function written and deployed in Azure cannot be transferred to serverless Lambda in AWS seamlessly.  You will need to re-implement the same logic in Lambda in AWS way.

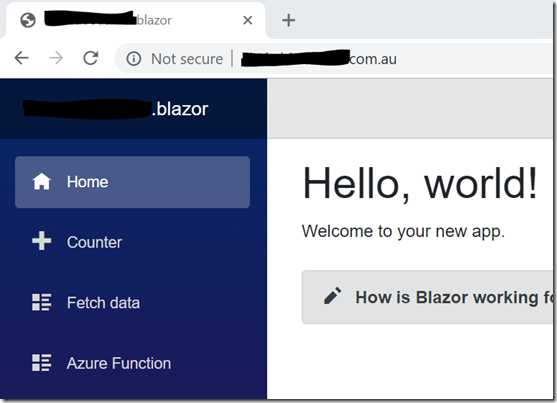
I will demo a serverless Blazor SPA app from scratch to Azure with serverless Function and C# full stack frontend and backend. This approach includes the following three apps.

1. Serverless Blazor SPA client app written in C# – they are static pages which are deployed to Azure Blob storage and hosted with Azure CDN service.

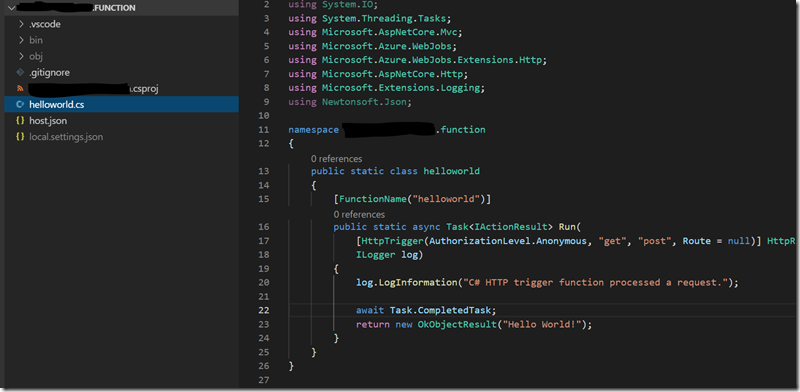
2. Serverless Function written in C# – it is just an echo API function to return ‘Hello World’.

3. Non-Serverless API written in C# (you can convert APIs to serverless Functions for full serverless infrastructure) – it is .Net Core 3 and hosted as App Server in Windows machine and will be transferred to Linux and docker soon because .Net Core 3 is not available in Linux at this moment (.Net Core 3 just released 23rd Sept 2019 this week).

Let’s get started.

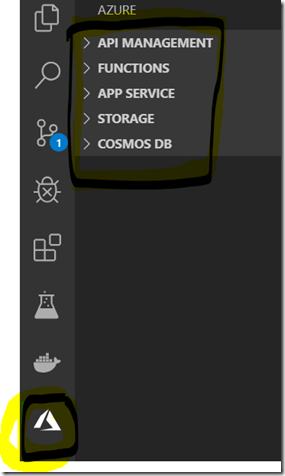
1. Serverless Blazor SPA client app deployment – Visual Studio Code offers an option to deploy Blazor app to Azure Blob. First install ‘Azure Tool’ app to VS Code which will install API Management, Functions, App Server, Storage and Comos DB tools for you. Then it will guide you to login to your Azure account when you are ready to use it.

image

image

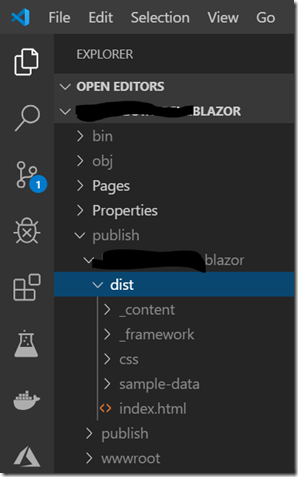
Once they are installed. Please run the following command against Blazor app to generate the release version of it. Then you will see a ‘publish’ folder generated with a ‘dist’ folder within it.

dotnet publish -c Release -o ./publish

image

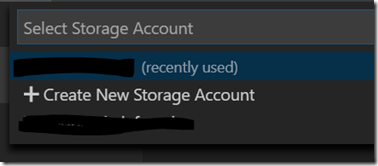
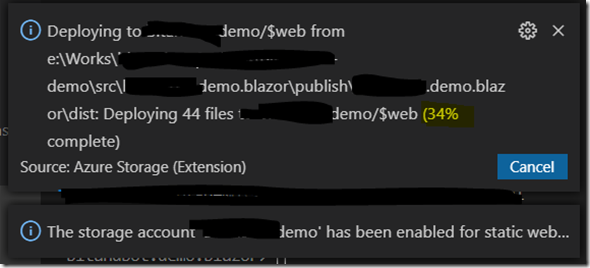
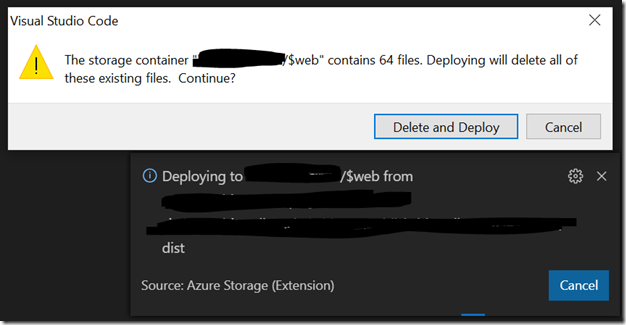
‘dist’ folder is the one to be deployed to Azure Blob. Please right click ‘dist’ folder to bring up context menu in where you will see in the last option of ‘Deploy to Static Website’ and follow the instructions to create a new storage account for Static Website hosting in Azure Blob. This option will make some configuration settings for Azure Blob such as mark Azure Blob as ‘Static Website’ and name the hosting folder to ‘$web’ with all the files from ‘dist’ folder.  Microsoft have done a very good job in deployment from VS Code for Azure cloud services.

image

image

Once created a new storage account under West US by default, Blazor app will be deployed to it directly via Visual Studio Code.

imageimage

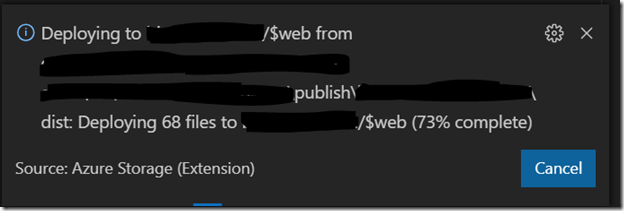
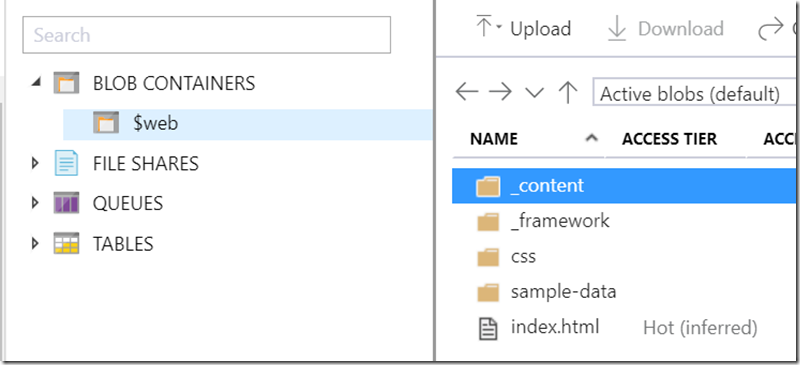
Files are transferred from local to ‘$web’ folder in Azure Blob.

imageimage

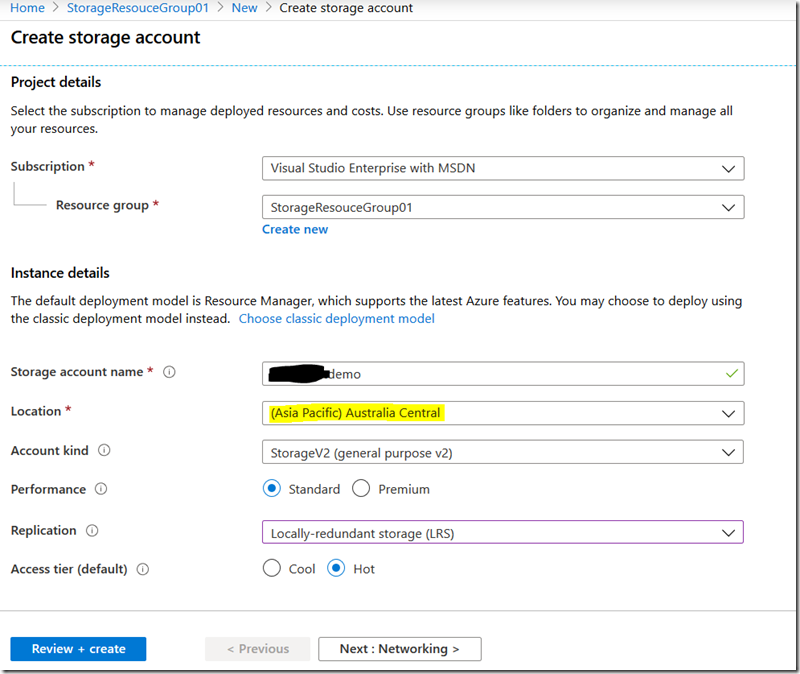
Azure can give me more customization in Storage account such as location, so I create Storage account under Australia East there. And I will need to enabled ‘Static website’ manually.image

In Azure Blob, $web is created and Static Website is enabled though this deployment process.

image

image

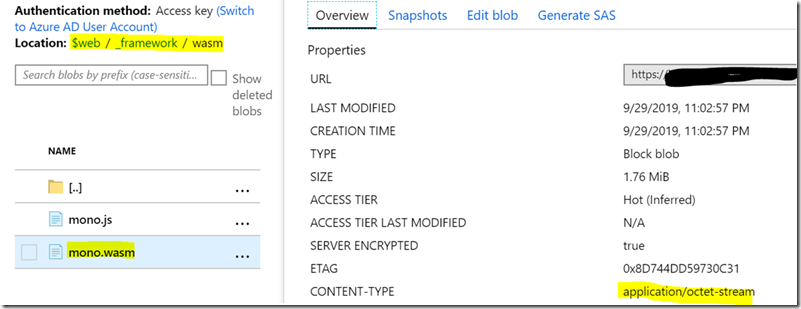
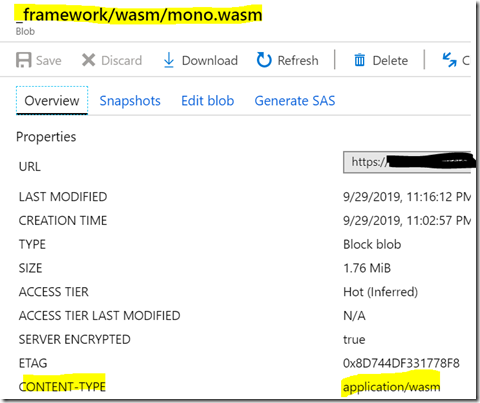
Updated 2020-02-03: ‘Content-Type’ of ‘mono.wasm’ is auto set to ‘application/wasm’ when deploy to static website via Visual Studio Code. But you can still read the following instructions for further info how it works.image

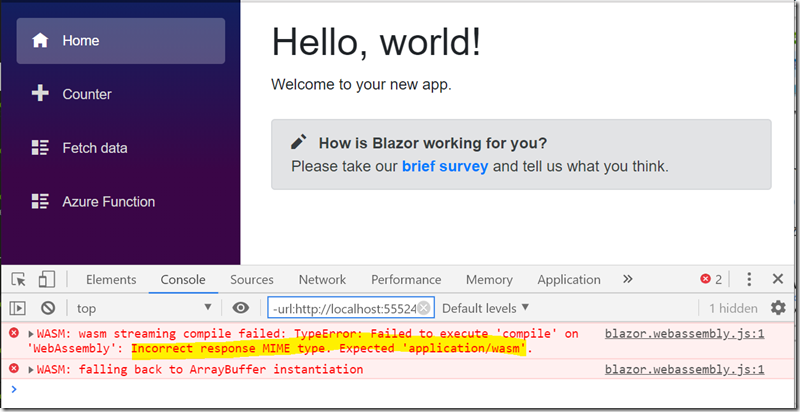
Then you will need to update ‘Content-Type’ of ‘mono.wasm’ file from ‘application/octet-stream’ to ‘application/wasm’ using the following command in PowerShell or Command Prompt (given Azure CLI tool is installed) otherwise you will get error from browser.

image

image

Command to fix this incorrect response MIME type issue. It cannot be done via Azure Portal.

az storage blob update --account-name __azure_blob_name__ -c $web -n _framework/wasm/mono.wasm --content-type application/wasm

image

image

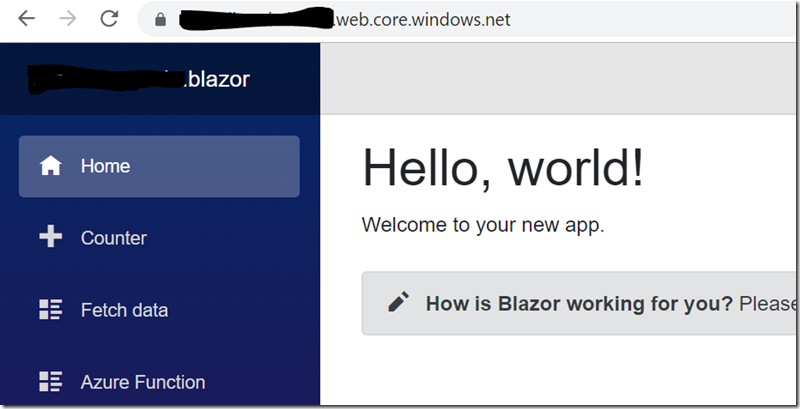
Serverless Blazor app is ready in web.

image

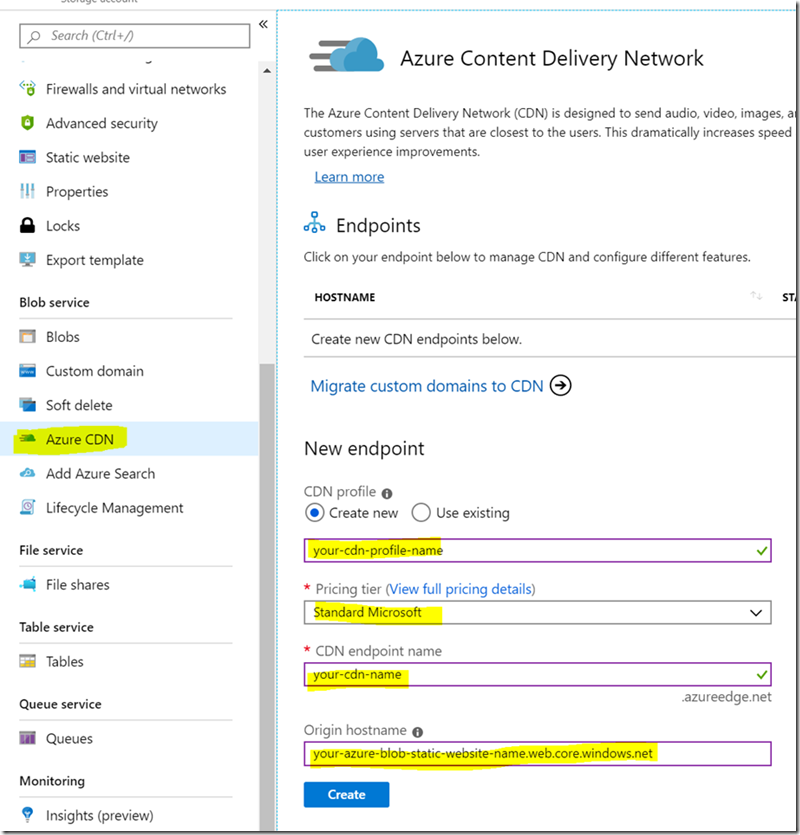
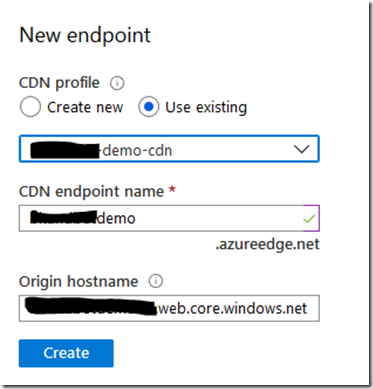
Go to Azure CDN and create a new one for content delivery network.

image

image

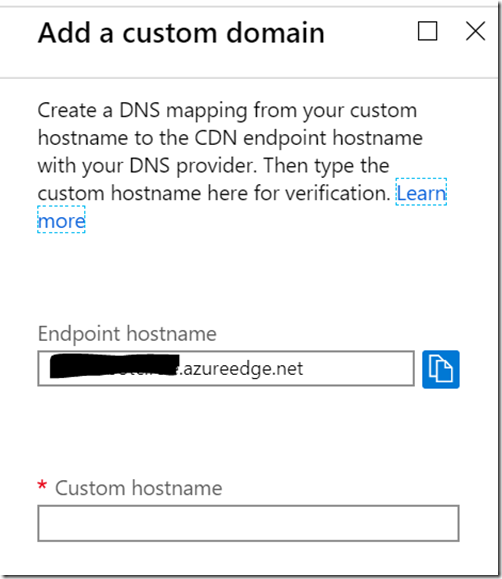
Once Azure CDN is provisioned, an endpoint __name__.azureedge.net is created and you can map to your custom domain such as example.com if you have one.

image

image

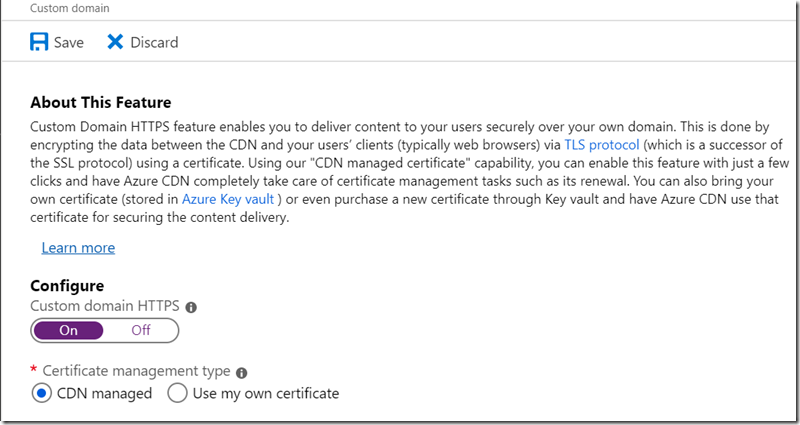
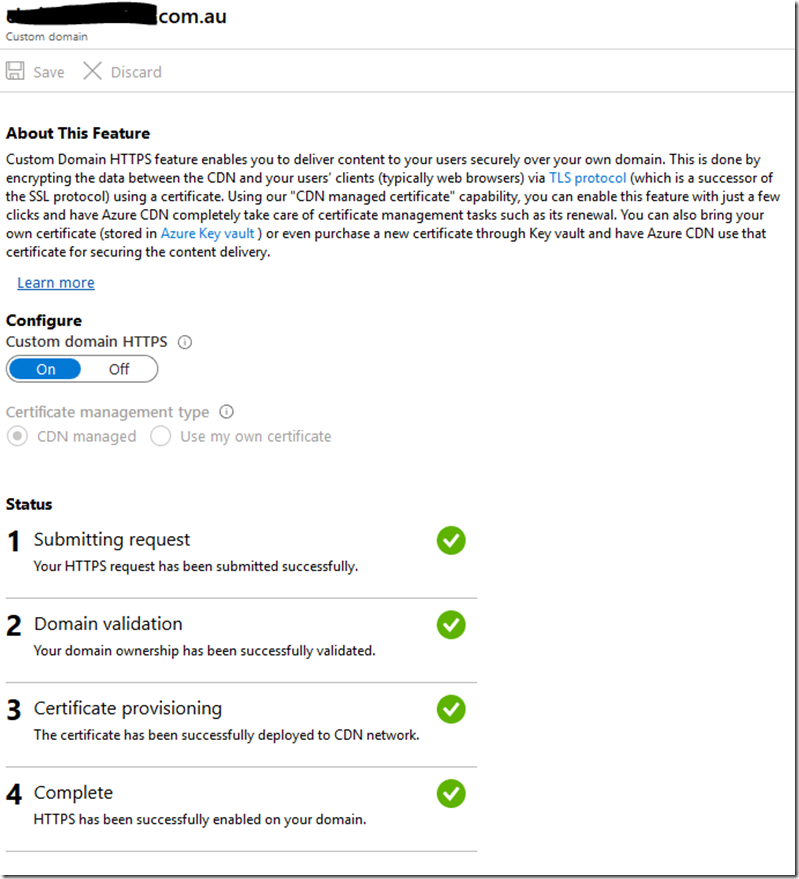
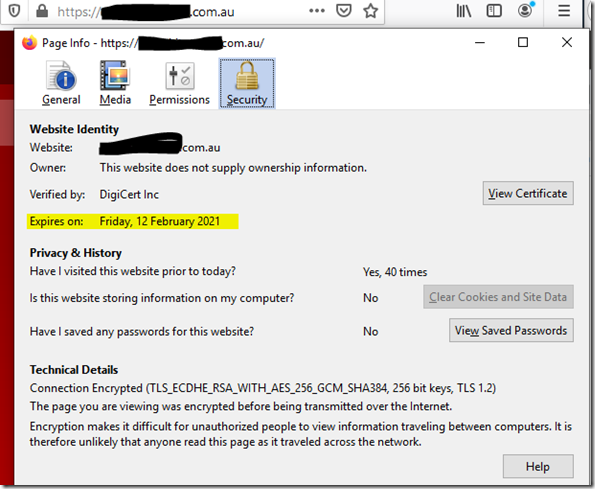
Then you can configure to have SSL for your custom domain or not. If yes, you will get an option to choose to use your own certificate or CDN managed by Azure. You will see my Blazor app not being protected under SSL and I will setup SSL with CDN managed later.

image

image

image

image

image

2. Serverless Function – still VS Code is a winner to deploy serverless Function from local to Azure.

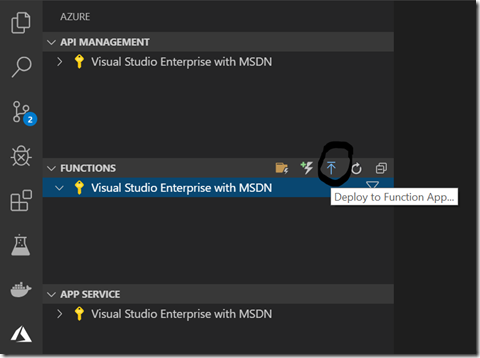
I have my ‘Hello World’ Function ready and then use the ‘arrow up’ icon in Function Azure Tool to deploy to Azure. 

image

image

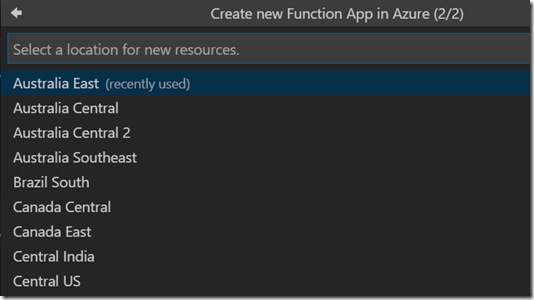
Choose to create new Function App in Azure and type the unique global name (just make up something close to your service), and then select a region to deploy.

image

 image

image

Then serverless Function is being provisioned and it will take a while to complete.

image

image

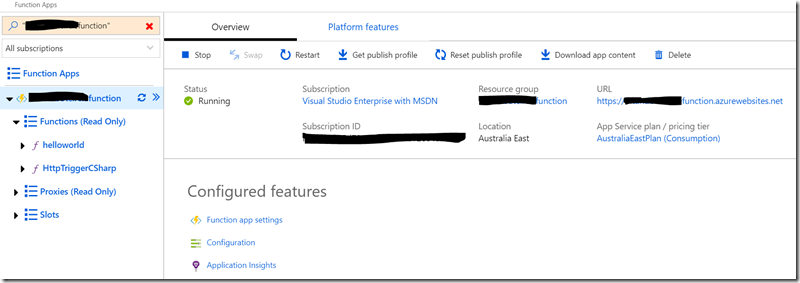
Serverless Function is ready and you can browse it where is hosted under SSL.

image

image

image

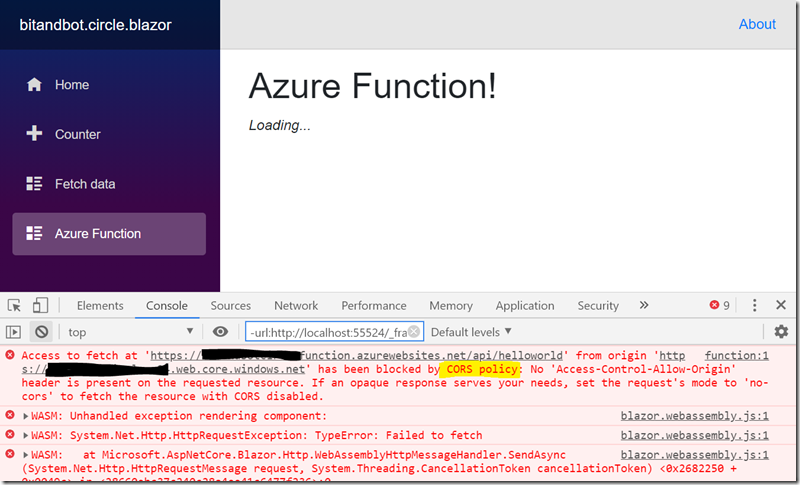
One last step to make serverless Function to be accessible from Blazor app is to configure CORS policy otherwise the following error occurs.

image

Go to ‘Platform feature >> CORS’ option and type the domain to allow CORS. You should have 3 of them including Azure Blob Url, Azure CDN Url and your custom domain (or even including the one from your local dev machine for testing purpose).

image

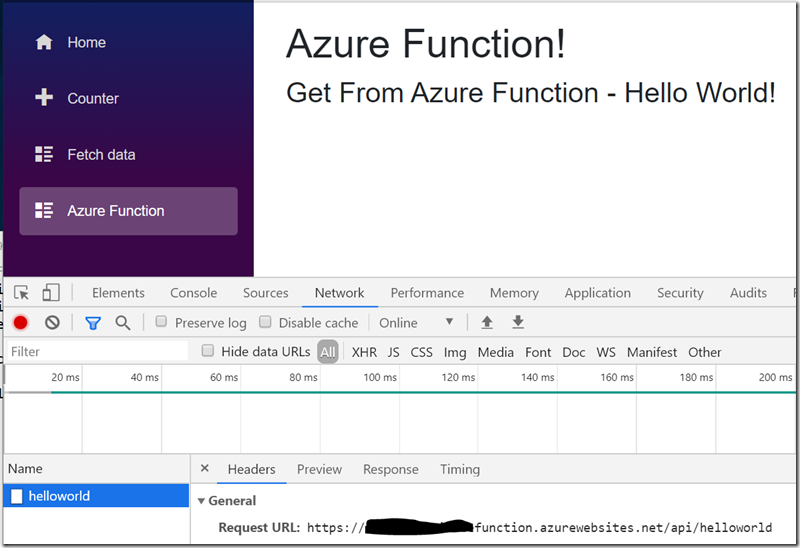
Verify Blazor app for serverless Function

image

3. Non-Serverless API in .Net Core 3 which is just launched so Linux App Server does not support it at this stage. This deployment is not seamlessly as there are extra steps to configure API app to run under .Net Core 3. This time you will need Visual Studio 2019.

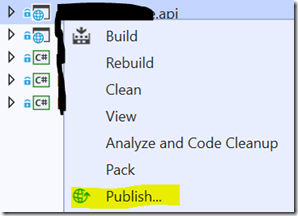
Right click the API project you would like to deploy, an option ‘Publish’ is shown in context menu.

image

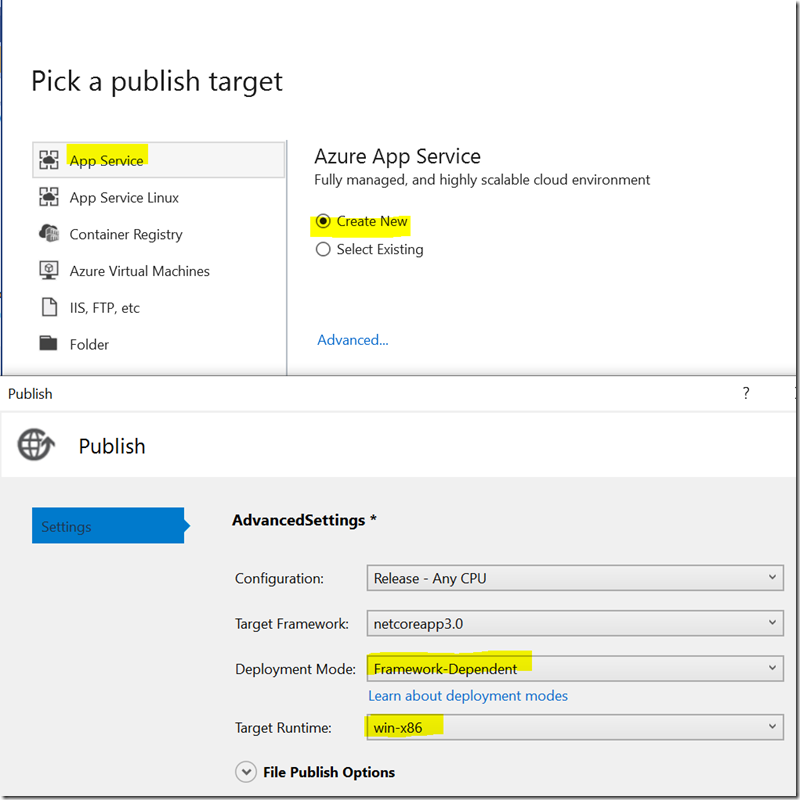
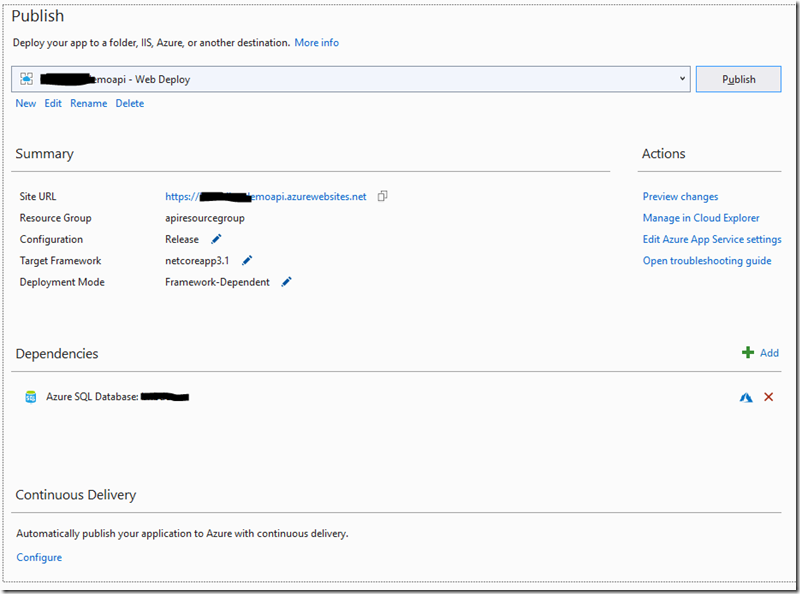
Select ‘App Service’ for Windows server which  supports .Net Core 3 and then select ‘Create New’ and then click ‘Advanced’ for advanced settings.

imageimageimage

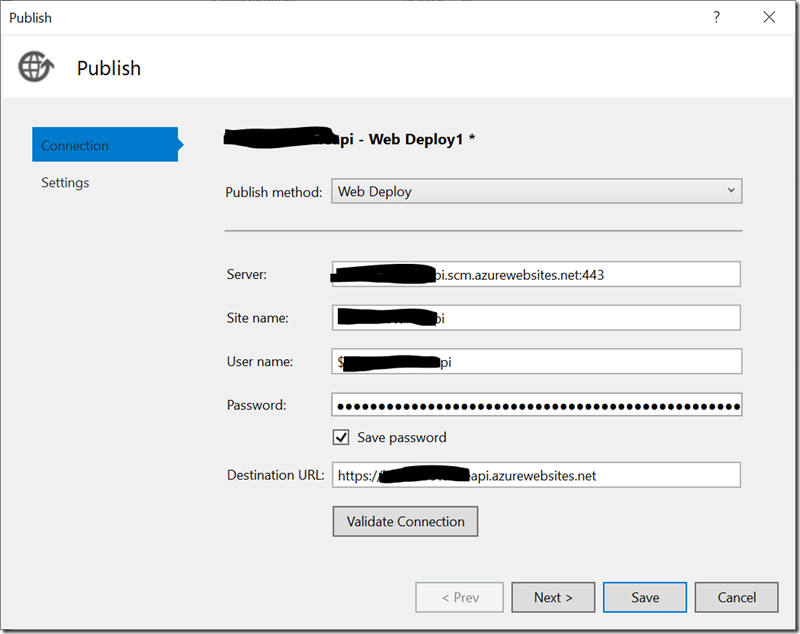
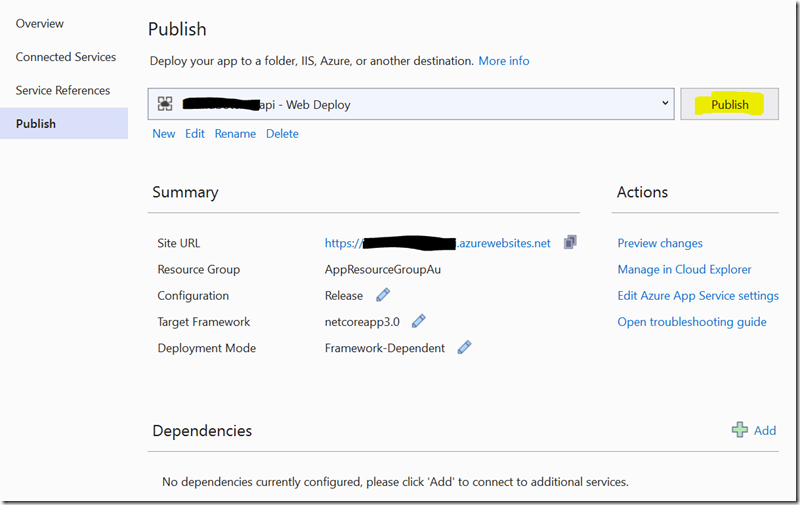
Once publish profile is configured and saved, then click ‘Publish’ to deploy API app. You will be prompted to type the globally unique name for API site which is with ‘azurewebsites.net’ domain associated under SSL.

imageimage

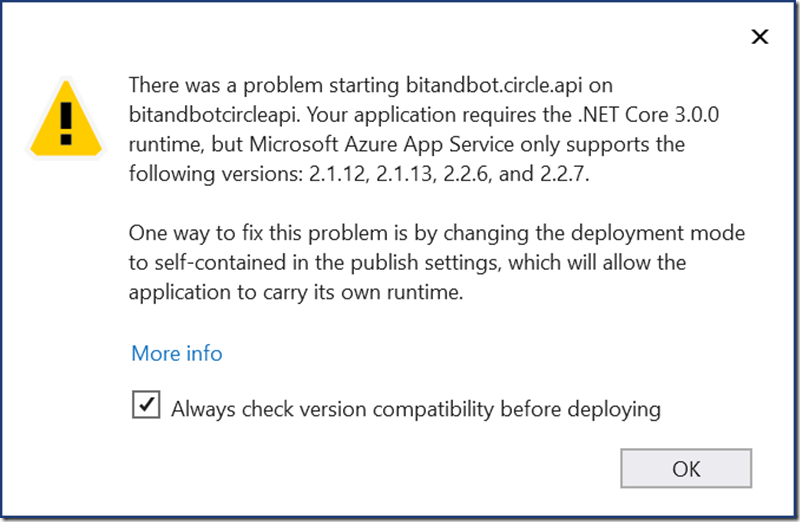
Two additional steps need to be configured to enable .Net Core 3 support in App Server due to the following warning in which .Net Core 3 is not ready in Azure by default.

image

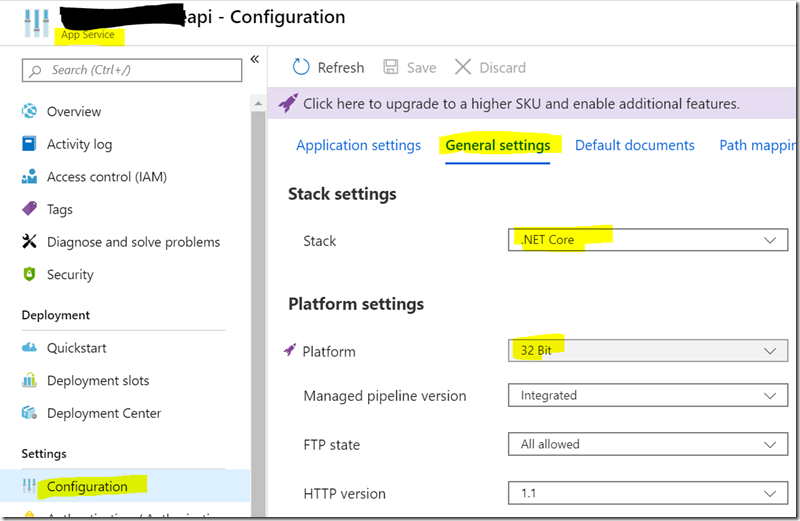
Open API app in Azure and go ‘Configuration >> General settings’, then enable ‘NET Core’ for Stack (it was empty by default) and enable ‘32 Bit’ for Platform (mine is free App Server and only 32 Bit is available). If API app is using SignalR, then enable ‘Web Socket’ as well.

image

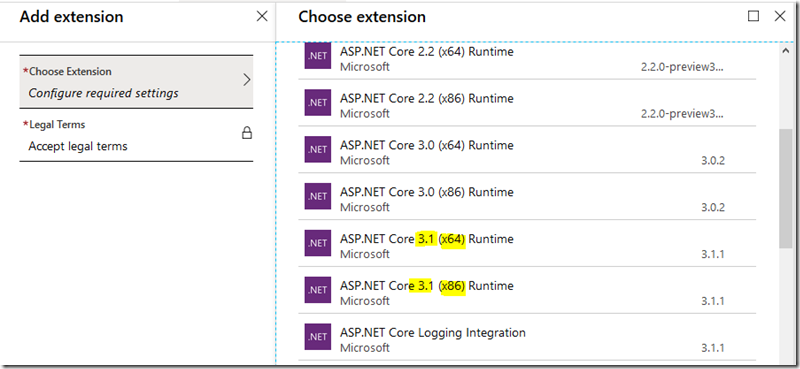
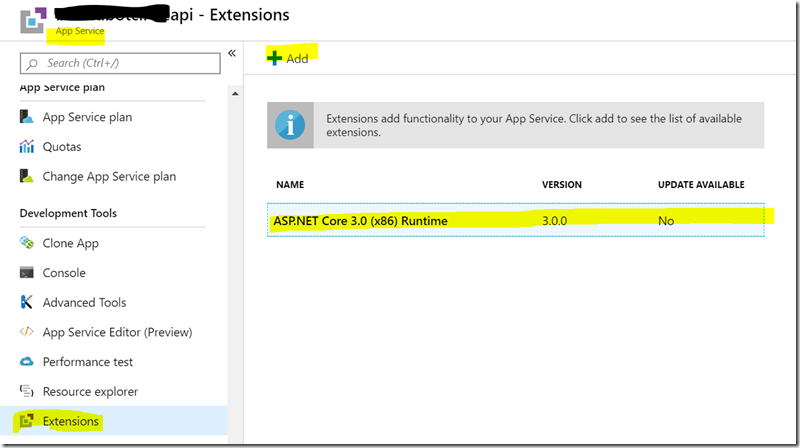
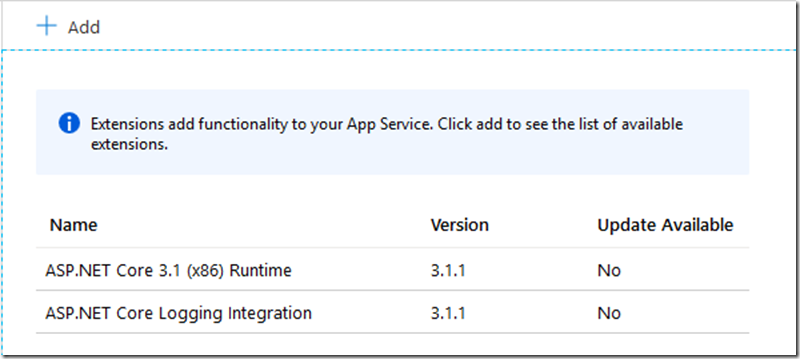
Finally, .Net Core 3 extension will need to be installed as the default one is .Net Core 2.2. Go ‘Extensions’ where you can add ‘ASP.NET Core 3.0 (x86) Runtime’ extension. Please select x64 if your App Server is 64 Bit.

imageimageimage

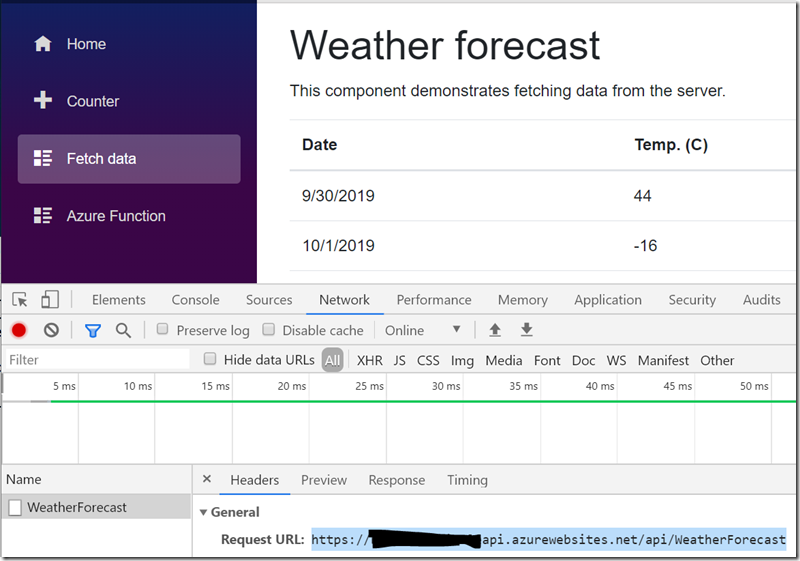
Test API and you will be amazed that it works (it took me a while to figure out the configuration above for .Net Core 3).

imageimage

Verify Blazor app for API

image

Enjoy and let’s make every app serverless Smile

Updated: Serve API with database deployment. You will need the correct version of EF dotnet install in your machine. Here shows the incompatible EF version between .Net Core 3 and EF preview 6.

image

Run this create or update dotnet command to get up-to-date EF library.

PM> dotnet ef dbcontext list --json
System.MissingMethodException: Method not found: 'System.Text.Json.JsonDocument System.Text.Json.JsonDocument.Parse(System.IO.Stream, System.Text.Json.JsonReaderOptions)'.
   at Microsoft.EntityFrameworkCore.Tools.RootCommand.Execute()
   at Microsoft.EntityFrameworkCore.Tools.Commands.CommandBase.<>c__DisplayClass0_0.b__0()
   at Microsoft.DotNet.Cli.CommandLine.CommandLineApplication.Execute(String[] args)
   at Microsoft.EntityFrameworkCore.Tools.Program.Main(String[] args)
Method not found: 'System.Text.Json.JsonDocument System.Text.Json.JsonDocument.Parse(System.IO.Stream, System.Text.Json.JsonReaderOptions)'.
PM> dotnet tool install --global dotnet-ef --version 3.0.0
dotnet : Tool 'dotnet-ef' is already installed.
At line:1 char:1
+ dotnet tool install --global dotnet-ef --version 3.0.0
+ ~~~~~~~~~~~~~~~~~~~~~~~~~~~~~~~~~~~~~~~~~~~~~~~~~~~~~~
    + CategoryInfo          : NotSpecified: (Tool 'dotnet-ef' is already installed.:String) [], RemoteException
    + FullyQualifiedErrorId : NativeCommandError
dotnet tool install --global dotnet-ef --version 3.0.0
dotnet tool update --global dotnet-ef --version 3.0.0

Updated 2019-10-27:

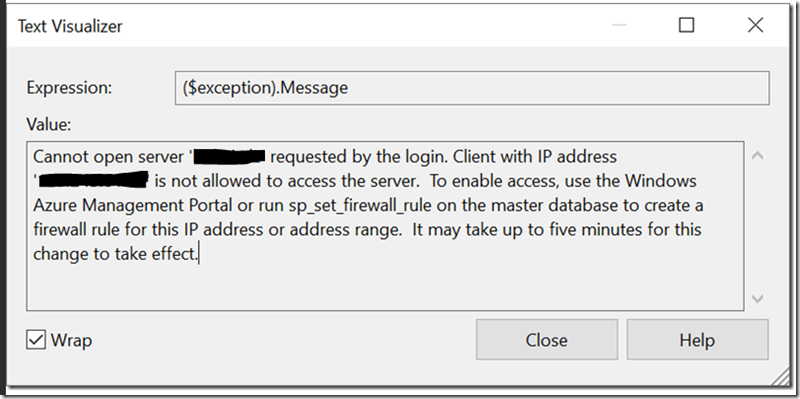
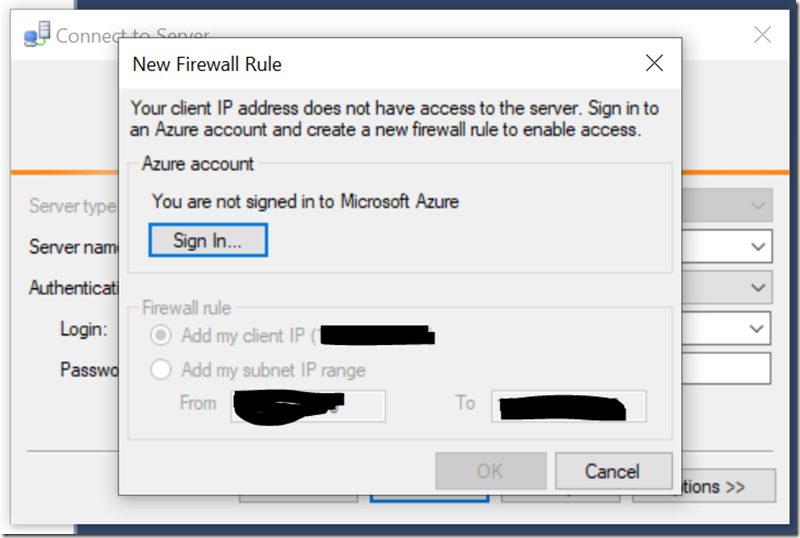
Running local dev requires access to Azure SQL server and will need to access grant for your local IP address from Azure. For dynamic local IP address assigned from provider will need to grant access via SQL studio or Azure, otherwise the firewall error will occur.

image

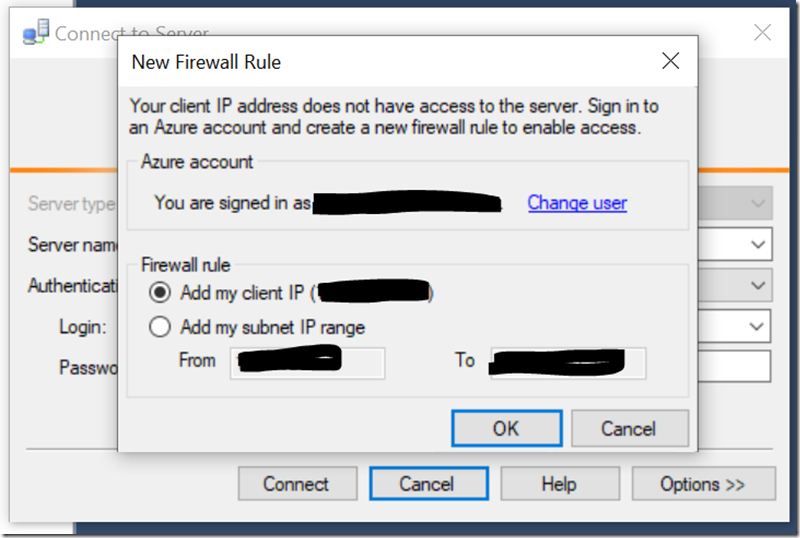
Grant access via SQL Studio for local development to Azure SQL server and it requires Azure login.

image

image

JWT Token

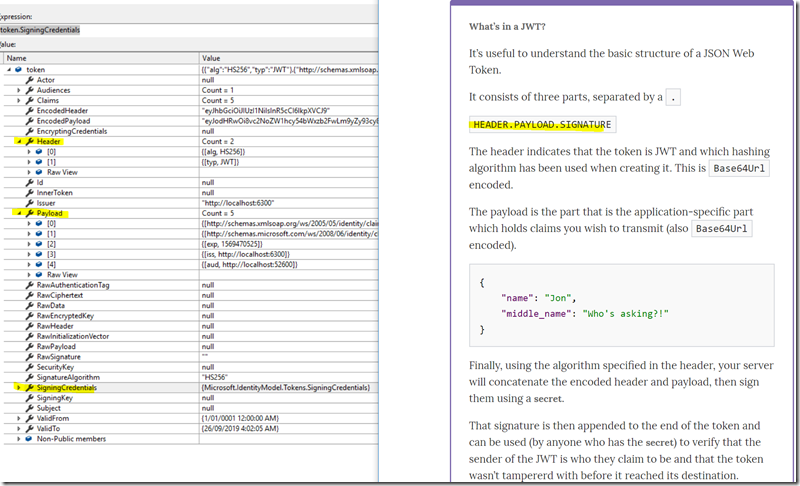
JWT token composites of three parts and separated by a DOT – header.payload.signature.

image

In server side, a token is generated and serialised to based64 string with a DOT separator

"token": 
"eyJhbGciOiJIUzI1NiIsInR5cCI6IkpXVCJ9.eyJodHRwOi8vc2NoZW1hcy54bWxzb2FwLm9yZy93cy8yMDA1LzA1L2lkZW50aXR5L2NsYWltcy9uYW1lIjoiRkRTRlNGQFNEQUZEUy5DT00iLCJodHRwOi8vc2NoZW1hcy5taWNyb3NvZnQuY29tL3dzLzIwMDgvMDYvaWRlbnRpdHkvY2xhaW1zL3JvbGUiOiJVc2VyIiwiZXhwIjoxNTY5NDcwNTI1LCJpc3MiOiJodHRwOi8vbG9jYWxob3N0OjYzMDAiLCJhdWQiOiJodHRwOi8vbG9jYWxob3N0OjUyNjAwIn0.7W3dPBbFmzYCPP3t4yTUjYFrHtucy8NcYlxuSIsluzk"

In server side, a token shows clearly with a DOT separator

"token": 
	"eyJhbGciOiJIUzI1NiIsInR5cCI6IkpXVCJ9
	.
	eyJodHRwOi8vc2NoZW1hcy54bWxzb2FwLm9yZy93cy8yMDA1LzA1L2lkZW50aXR5L2NsYWltcy9uYW1lIjoiRkRTRlNGQFNEQUZEUy5DT00iLCJodHRwOi8vc2NoZW1hcy5taWNyb3NvZnQuY29tL3dzLzIwMDgvMDYvaWRlbnRpdHkvY2xhaW1zL3JvbGUiOiJVc2VyIiwiZXhwIjoxNTY5NDcwNTI1LCJpc3MiOiJodHRwOi8vbG9jYWxob3N0OjYzMDAiLCJhdWQiOiJodHRwOi8vbG9jYWxob3N0OjUyNjAwIn0
	.
	7W3dPBbFmzYCPP3t4yTUjYFrHtucy8NcYlxuSIsluzk"

In client side (SPA), code to deserialise payload from payload part of token, so SPA can base on claim for routing logic.

private IEnumerable ParseClaimsFromJwt(string jwt)
{
    var claims = new List();
    var payload = jwt.Split('.')[1];    // extract the payload part of token (header.payload.signature) in where claims exist
    var jsonBytes = ParseBase64WithoutPadding(payload);
    var keyValuePairs = JsonSerializer.Deserialize>(jsonBytes);

    keyValuePairs.TryGetValue(ClaimTypes.Role, out object roles);

    // If a role claim is present then we check if the first character is a [ indicating it’s a JSON array. 
    // If the character is found then roles is parsed again to extract the individual role names. 
    // We then loop through the role names and add each as a claim. 
    // If roles is not an array then its added as a single role claim.
    if (roles != null)
    {
        if (roles.ToString().Trim().StartsWith("["))
        {
            var parsedRoles = JsonSerializer.Deserialize(roles.ToString());

            foreach (var parsedRole in parsedRoles)
            {
                claims.Add(new Claim(ClaimTypes.Role, parsedRole));
            }
        }
        else
        {
            claims.Add(new Claim(ClaimTypes.Role, roles.ToString()));
        }

        keyValuePairs.Remove(ClaimTypes.Role);
    }

    claims.AddRange(keyValuePairs.Select(kvp => new Claim(kvp.Key, kvp.Value.ToString())));

    return claims;
}

private byte[] ParseBase64WithoutPadding(string base64)
{
    switch (base64.Length % 4)
    {
        case 2: base64 += "=="; break;
        case 3: base64 += "="; break;
    }
    return Convert.FromBase64String(base64);
}

Data Science – Machine Learning

Hands on session to train a model based on a dataset in Data Science and this refers to Machine Leaning. The machine is learning your dataset against the model you offered to train such as line regression, classification or others.

1 Source: Get sample dataset

!curl https://topcs.blob.core.windows.net/public/FlightData.csv -o flightdata.csv

2 Ingest: Import Pandas for DataFrame and list some info of dataset for analysis

import pandas as pd

df = pd.read_csv('flightdata.csv')
df.head()

image

3 Process: In the real world, few datasets can be used as-is to train machine-learning models. It is not uncommon for data scientists to spend 80% or more of their time on a project cleaning, preparing, and shaping the data — a process sometimes referred to as data wrangling. Typical actions include removing duplicate rows, removing rows or columns with missing values or algorithmically replacing the missing values, normalizing data, and selecting feature columns. A machine-learning model is only as good as the data it is trained with. Preparing the data is arguably the most crucial step in the machine-learning process.

Before you can prepare a dataset, you need to understand its content and structure. In the previous steps, you imported a dataset containing on-time arrival information for a major U.S. airline. That data included 26 columns and thousands of rows, with each row representing one flight and containing information such as the flight’s origin, destination, and scheduled departure time. You also loaded the data into the Jupyter notebook and used a simple Python script to create a pandas DataFrame from it.

df.shape #(11231, 26)

list(df)

df.isnull().values.any() #True

df.isnull().sum()

df = df[["MONTH", "DAY_OF_MONTH", "DAY_OF_WEEK", "ORIGIN", "DEST", "CRS_DEP_TIME", "ARR_DEL15"]]
df.isnull().sum()

df[df.isnull().values.any(axis=1)].head()

df = df.fillna({'ARR_DEL15': 1})
df.iloc[177:185]

df.head() 
df = pd.get_dummies(df, columns=['ORIGIN', 'DEST'])
df.head()

4 Predict: Machine learning, which facilitates predictive analytics using large volumes of data by employing algorithms that iteratively learn from that data, is one of the fastest growing areas of data science.

One of the most popular tools for building machine-learning models is Scikit-learn, a free and open-source toolkit for Python programmers. It has built-in support for popular regression, classification, and clustering algorithms and works with other Python libraries such as NumPy and SciPy. With Sckit-learn, a simple method call can replace hundreds of lines of hand-written code. Sckit-learn allows you to focus on building, training, tuning, and testing machine-learning models without getting bogged down coding algorithms.

We will use Sckit-learn to build a machine-learning model utilizing on-time arrival data for a major U.S. airline. The goal is to create a model that might be useful in the real world for predicting whether a flight is likely to arrive on time. It is precisely the kind of problem that machine learning is commonly used to solve.

from sklearn.model_selection import train_test_split
train_x, test_x, train_y, test_y = train_test_split(df.drop('ARR_DEL15', axis=1), df['ARR_DEL15'], test_size=0.2, random_state=42)

train_x.shape #(8984, 14) 

test_x.shape #(2247, 14)

from sklearn.ensemble import RandomForestClassifier
model = RandomForestClassifier(random_state=13)
model.fit(train_x, train_y)

predicted = model.predict(test_x)
model.score(test_x, test_y)

from sklearn.metrics import roc_auc_score
probabilities = model.predict_proba(test_x)

roc_auc_score(test_y, probabilities[:, 1])

from sklearn.metrics import confusion_matrix
confusion_matrix(test_y, predicted)

from sklearn.metrics import precision_score
train_predictions = model.predict(train_x)
precision_score(train_y, train_predictions)

from sklearn.metrics import recall_score
recall_score(train_y, train_predictions)

5 Visualize: Now that you that have trained a machine-learning model to perform predictive analytics, it’s time to put it to work. In this lab, the final one in the series, you will write a function that uses the machine-learning model you built in the previous lab to predict whether a flight will arrive on time or late. And you will use Matplotlib, the popular plotting and charting library for Python, to visualize the results.

%matplotlib inline
import matplotlib.pyplot as plt
import seaborn as sns
sns.set()

from sklearn.metrics import roc_curve
fpr, tpr, _ = roc_curve(test_y, probabilities[:, 1])
plt.plot(fpr, tpr)
plt.plot([0, 1], [0, 1], color='grey', lw=1, linestyle='--')
plt.xlabel('False Positive Rate')
plt.ylabel('True Positive Rate')

def predict_delay(departure_date_time, origin, destination):
    from datetime import datetime

    try:
        departure_date_time_parsed = datetime.strptime(departure_date_time, '%d/%m/%Y %H:%M:%S')
    except ValueError as e:
        return 'Error parsing date/time - {}'.format(e)
    
    month = departure_date_time_parsed.month
    day = departure_date_time_parsed.day
    day_of_week = departure_date_time_parsed.isoweekday()
    hour = departure_date_time_parsed.hour
    
    origin = origin.upper()
    destination = destination.upper()

    input = [{'MONTH': month,
              'DAY': day,
              'DAY_OF_WEEK': day_of_week,
              'CRS_DEP_TIME': hour,
              'ORIGIN_ATL': 1 if origin == 'ATL' else 0,
              'ORIGIN_DTW': 1 if origin == 'DTW' else 0,
              'ORIGIN_JFK': 1 if origin == 'JFK' else 0,
              'ORIGIN_MSP': 1 if origin == 'MSP' else 0,
              'ORIGIN_SEA': 1 if origin == 'SEA' else 0,
              'DEST_ATL': 1 if destination == 'ATL' else 0,
              'DEST_DTW': 1 if destination == 'DTW' else 0,
              'DEST_JFK': 1 if destination == 'JFK' else 0,
              'DEST_MSP': 1 if destination == 'MSP' else 0,
              'DEST_SEA': 1 if destination == 'SEA' else 0 }]

    return model.predict_proba(pd.DataFrame(input))[0][0]

predict_delay('1/10/2018 21:45:00', 'JFK', 'ATL')

predict_delay('2/10/2018 21:45:00', 'JFK', 'ATL')

predict_delay('2/10/2018 10:00:00', 'ATL', 'SEA')
import numpy as np

labels = ('Oct 1', 'Oct 2', 'Oct 3', 'Oct 4', 'Oct 5', 'Oct 6', 'Oct 7')
values = (predict_delay('1/10/2018 21:45:00', 'JFK', 'ATL'),
          predict_delay('2/10/2018 21:45:00', 'JFK', 'ATL'),
          predict_delay('3/10/2018 21:45:00', 'JFK', 'ATL'),
          predict_delay('4/10/2018 21:45:00', 'JFK', 'ATL'),
          predict_delay('5/10/2018 21:45:00', 'JFK', 'ATL'),
          predict_delay('6/10/2018 21:45:00', 'JFK', 'ATL'),
          predict_delay('7/10/2018 21:45:00', 'JFK', 'ATL'))
alabels = np.arange(len(labels))

plt.bar(alabels, values, align='center', alpha=0.5)
plt.xticks(alabels, labels)
plt.ylabel('Probability of On-Time Arrival')
plt.ylim((0.0, 1.0))
Data Science in Python

Let’s learn one basic element ‘2D Array’ of Python which plays an important role in Data Science. And one key task of Data Science is data cleaning and fixing in a 2D array data source which will take about 70%-80% of Data Science time.

Array Index: word == word[2:] + word[:2]

+—+—+—+—+—+—+
  | P | y | t | h | o | n |
  +—+—+—+—+—+—+
  0   1   2   3   4   5   6
-6  -5  -4  -3  -2  -1

Library heavily used in Data Science.

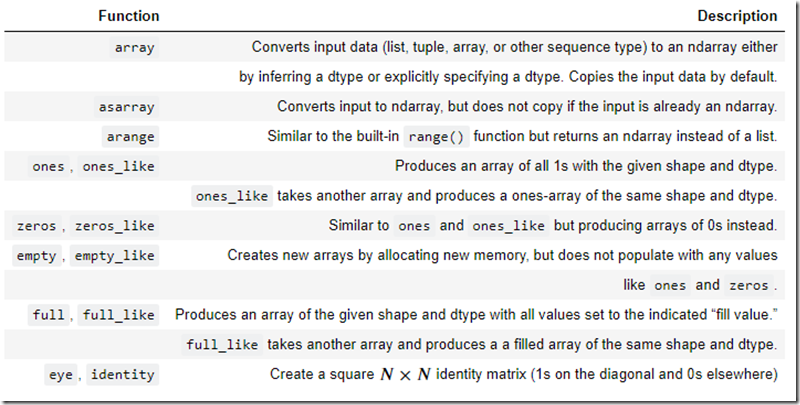
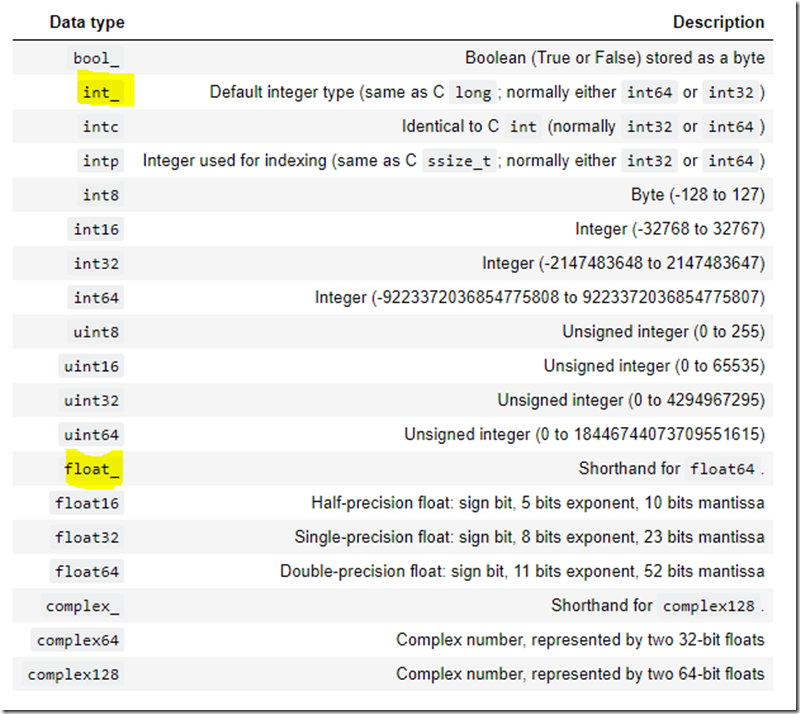
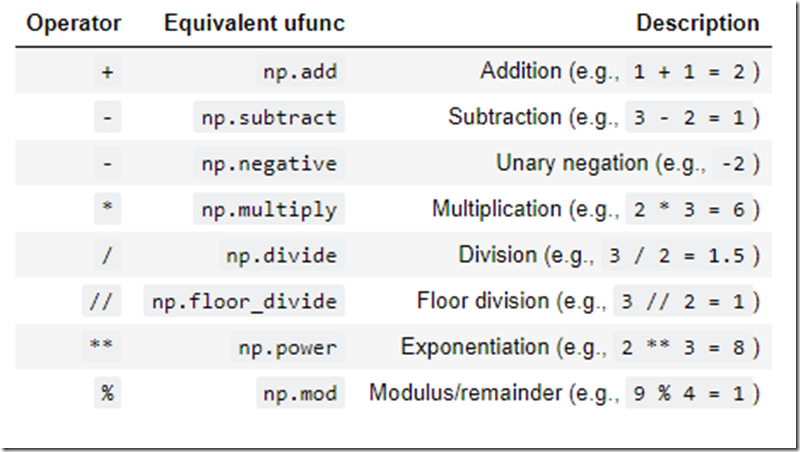
Numpy library ‘import numpy as np’ is a few extremely important libraries for data science in Python.  It is great for efficiently loading, storing and manipulating in-memory data.  ‘Slicing array – a[start:stop:step]’ is often used in data cleaning.

image

image

image

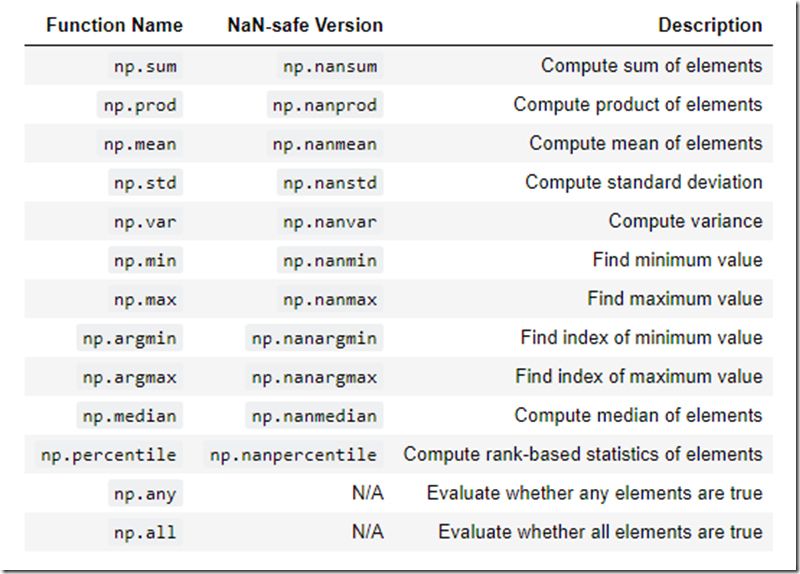
Other aggregation functions
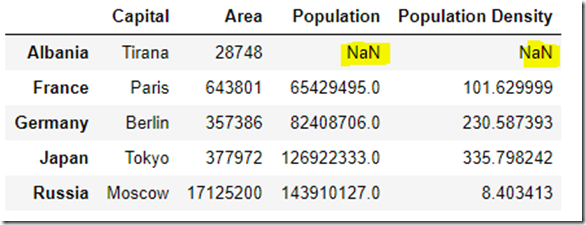
The table below lists other aggregation functions in NumPy. Most NumPy aggregates have a ‘NaN-safe’ version, which computes the result while ignoring missing values marked by the NaN value.

image

Pandas library ‘import pandas as pd’ in Python really does a lot to make working with data–and importing, cleaning, and organizing it–so much easier that it is hard to imagine doing data science in Python without it. One element in Pandas is DataFrame which is 2D array and Data Sciences uses it to handle lots of data cleaning and manipulating. Indexers ‘loc and iloc’ is to indicate the index with name (implicit index) or index (explicit index)
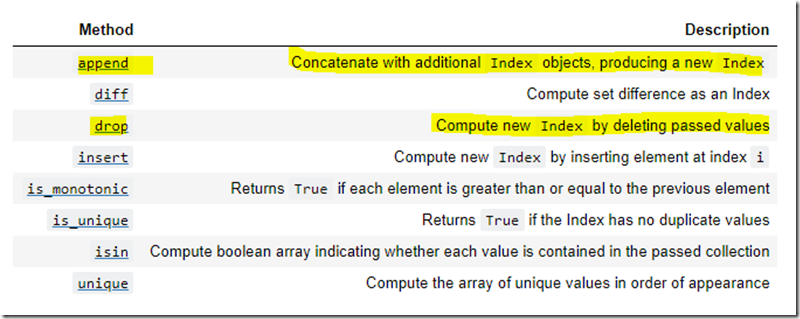
image

image

DataFrame functions to manipulate data: DataFrame.info(), DataFrame.head(), DataFrame.tail(), DataFrame.isnull(), DataFrame.notnull(), DataFrame.dropna(), DataFrame.fillna(), DataFrame.corr()

Seaborn library ‘import seaborn as sns’ is a tool of distribution plot such as sns.distplot(), sns.jointplot(), sns.pairplot()